Dear Guest,
Please register or login. Content don't create itself!
Thank you
-
 Re: Bringheli Jig Redesign
Todd
What would the two head tube cone supports plus cones cost to machine? I assume from the phots that they attach to a piece of 8020.
-
Re: Bringheli Jig Redesign
Mark,
Hit me up via email at [email protected]. I can send you more detailed pictures.
Thanks,
Todd
-
Re: Bringheli Jig Redesign
Thanks
Message sent, but I'm sure I'm not alone in seeing the potential of this.
My build method is ass backwards: I braze the chainstays to the BB plus the tube ferrules then bond all the main tubes to this skeleton. I'm looking at using the Anvil chainstay jig for its intended purpose and also as a tacking jig for the chainstays and BB.
I'm thinking that a couple of pieces of 8020 and your cone holders could make up a jig to hold the tubes during the curing cycles. It doesn't need to take much stress and it needs to be light enough to lift into and out of my curing oven. I'd prefer a laterally symmetrical layout to minimise the effect of warps from differential TCOE in the ~100 C temperature swing during the curing cycle.
-
Re: Bringheli Jig Redesign

Originally Posted by
Craig Ryan

Todd, if this all works it's the best thing to happen to a Bringheli I've seen. Just losing the rod through the headtube alone is huge.
Yep, me too-- 27 frames in, I'm pretty satisfied with my Bringheli frame jig. But if i could lose that  & cone/rod method of holding the head tube and go to something with two "pucks" a la Anvil, I'd be one happy guy. Todd, how much would an upgrade like yours cost? I know it won't be inexpensive, but the time and hassle it would save would be worth it to me. I'd bet there are at least ten other guys/gals out there who would like to improve their Bringheli jig in this area too
-
Re: Bringheli Jig Redesign
The way I made the head tube cone supports was a bit time consuming. I wanted to make them side mount so the handles would stay of the way. Bit in order to do this I had to machine a raised section to go into the t-slot to take out the rotational movement. If I were to do it over again I would do something similar to how Kris from 44 did his HT cone support. Let me put some CAD together on Tuesday and see what you guys think. I'm sure I could help you guys out, and figure out something a little less time consuming to machine so it won't be that expensive. I've used this setup for 2 frames now (going on 3), and it's 100X better than the original as far as setup goes and taking the bike in and out of the jig is no longer a hassle!
-
Re: Bringheli Jig Redesign
Originally Posted by
ToddFarr
The way I made the head tube cone supports was a bit time consuming. I wanted to make them side mount so the handles would stay of the way. Bit in order to do this I had to machine a raised section to go into the t-slot to take out the rotational movement. If I were to do it over again I would do something similar to how Kris from 44 did his HT cone support. Let me put some CAD together on Tuesday and see what you guys think. I'm sure I could help you guys out, and figure out something a little less time consuming to machine so it won't be that expensive. I've used this setup for 2 frames now (going on 3), and it's 100X better than the original as far as setup goes and taking the bike in and out of the jig is no longer a hassle!
Todd,
I'm ready for the front HT upgrade as soon as you have it available. Please ensure it will handle the 44mm headtubes that we use for tapered steer tubes. FYI, the rear dummy axle holder upgrade is fantastic. I rec'd it thursday. The fit & finish exceeds all my expectations. thanks
-
Re: Bringheli Jig Redesign
I'm betting before the end of next year you guys have a completely new fixture. Todd Rules!
-
Re: Bringheli Jig Redesign
Thanks Jonathan!
I sat down this week to work on the design and it just felt a little forced. I think I've just had to much other stuff on my mind. Anyways sometimes you just need to let these ideas sit for a bit and come back with a new perspective. On my way home from the shop today I think I have a pretty decent idea.. I'll post the CAD up tomorrow.
-
Re: Bringheli Jig Redesign
As promised... the real nice thing is that it uses the same main piece from my Backend Modification. I already have the program, and really liked how it worked.
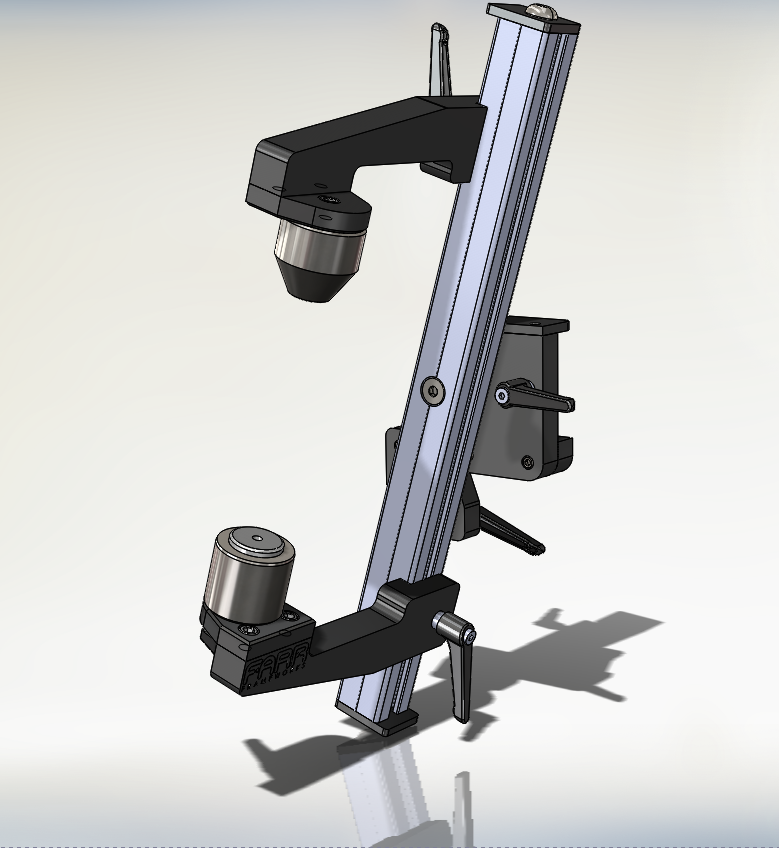
Bringheli Front End Mod REV2 by FARR Frameworks, on Flickr
-
Re: Bringheli Jig Redesign
Todd, now you’ve really done it. You’re teasing me with pictures again. Wow that looks awesome. If it works as well at the other end you can count me in.
Mike
-
Re: Bringheli Jig Redesign
Holy hot damn. That looks great. I've moved on from my bringheli but this make it look like building bikes would be WAY easier. Setting up the front end (and the headcones) are a pain in the ass.
I really really love the translation/rotation of the standoff arm so you only have to design/setup one thing (that you already have a cam file for!) and so the levers clear everything. Engineering nerd alert!
BRAVO.
-
Re: Bringheli Jig Redesign
Originally Posted by
PJN
Holy hot damn. That looks great. I've moved on from my bringheli but this make it look like building bikes would be WAY easier. Setting up the front end (and the headcones) are a pain in the ass.
I really really love the translation/rotation of the standoff arm so you only have to design/setup one thing (that you already have a cam file for!) and so the levers clear everything. Engineering nerd alert!
BRAVO.
The X scale will not be consistent since the head angle does not pivot on the bottom of the head tube. The scale can only be set with one head angle and be accurate. The pivot on the bottom of the head tube is also what makes the puck instead of the cone on the bottom useful. Your datum is constant and the pivot point is always on the bottom of the HT. This allows the Y scale to also be consistent no matter what size head tube you are using and no matter the angle of the head tube.
-
Re: Bringheli Jig Redesign
Originally Posted by
EnginCycles
The X scale will not be consistent since the head angle does not pivot on the bottom of the head tube. The scale can only be set with one head angle and be accurate. The pivot on the bottom of the head tube is also what makes the puck instead of the cone on the bottom useful. Your datum is constant and the pivot point is always on the bottom of the HT. This allows the Y scale to also be consistent no matter what size head tube you are using and no matter the angle of the head tube.
You can't easily do that here since the y on the bringheli is fixed. But that feature is nice as hell on the anvil. So easy to set up and modify.
He could add another piece of 8020 to act as a "y-slide" but then it would complicate the design and make it more expensive. I think what he ended up with is a huge improvement over the headcone system on the bringheli but is a compromise over what could be done if building a jig from scratch.
-
Re: Bringheli Jig Redesign
Originally Posted by
PJN
You can't easily do that here since the y on the bringheli is fixed. But that feature is nice as hell on the anvil. So easy to set up and modify.
He could add another piece of 8020 to act as a "y-slide" but then it would complicate the design and make it more expensive. I think what he ended up with is a huge improvement over the headcone system on the bringheli but is a compromise over what could be done if building a jig from scratch.
Sputnik was the first to use the puck in addition of the pivot on the bottom of the head tube design.
-
Re: Bringheli Jig Redesign
Originally Posted by
EnginCycles
The X scale will not be consistent since the head angle does not pivot on the bottom of the head tube. The scale can only be set with one head angle and be accurate. The pivot on the bottom of the head tube is also what makes the puck instead of the cone on the bottom useful. Your datum is constant and the pivot point is always on the bottom of the HT. This allows the Y scale to also be consistent no matter what size head tube you are using and no matter the angle of the head tube.
The goals for this are:
1) seperate cones replacing the pia single rod & cones.
2) abilty to set head angle & length seperately.
Unless I'm missing something, X,Y would be set exactly as they are now. I don't think Todd plans to include scales or graduation on this piece. Please let me know if I am misunderstanding part of your analysis. Thanks.
-
Re: Bringheli Jig Redesign
Originally Posted by
GAAP
The goals for this are:
1) seperate cones replacing the pia single rod & cones.
2) abilty to set head angle & length seperately.
Unless I'm missing something, X,Y would be set exactly as they are now. I don't think Todd plans to include scales or graduation on this piece. Please let me know if I am misunderstanding part of your analysis. Thanks.
My point was to just use a lower cone as it requires less steps and the puck assembly has lost its value since it does not pivot on the bottom of the head tube. Sorry I guess I was more replying to the other post. That is the point I was making.
-
Re: Bringheli Jig Redesign
Originally Posted by
EnginCycles
My point was to just use a lower cone as it requires less steps and the puck assembly has lost its value since it does not pivot on the bottom of the head tube. Sorry I guess I was more replying to the other post. That is the point I was making.
Im with Drew here, we all know Drew is very into tools and his process so he is giving great insight. With the lower floating in space the puck becomes more of a look how cool my tool is then look at the function, but if it works for you guys then by all means that is fine it is not going to hurt you, but it will add extra time and cost.
Sam Markovich
-
Re: Bringheli Jig Redesign
Drew,
I originally used a puck because on my Jig at home I have a separate, independently adjustable scale that sets the puck to the right x-y location. I've built all my bikes using just the x-y drawing translated to the system, and everyone sits over the full CAD drawing perfectly. The puck is useful separated from the rotation point as long as the x scale is not fixed.

The puck is nice because it provides a consistent datum, where as a cone position varies with tube diameter. The pointer is in the exact center and at the same height as the puck datum.
I'll probably provide cones with this modification to keep costs down because as Glenn said the two main goals where to get rid of the cone & rods and split the length and angle adjustments. Although with a puck you could set the jig up without a HT in it because you know that you have that solid datum.
(From Dave Anderson's Website)

Thanks - Todd
-
Make the puck reversible so that it will hold 1 1/8 or 44mm head tube, while keeping bottom of head tube constant with either side.
image-1143675736.jpg
-
Re: Bringheli Jig Redesign
Did you ever end up making any of these to sell? I would be very interested. Still using a bringheli jig
Similar Threads
-
By Craig Ryan in forum The Frame Forum@VSalon
Replies: 1
Last Post: 01-31-2011, 09:30 PM
-
By tmarsh in forum The Frame Forum@VSalon
Replies: 11
Last Post: 07-08-2010, 12:37 PM
 Posting Permissions
- You may not post new threads
- You may not post replies
- You may not post attachments
- You may not edit your posts
-
Forum Rules

 Likes:
 VSalonista (docendo discimus)


 Reply With Quote
Bookmarks