
 Likes:
 Thanks - and excellent tip! I was a bit worried about that. I'll definitely put in drain holes as you suggest.Originally Posted by Ras72


 *********-ish

 Captain Elbow flicking
Also, I'd be tempted to hit the contact points (top of the armrest, leading edge of the seat bottom, etc) with a 1/8" round-over router bit. It'll give a softer touch without taking away from the sharp look. A rounded edge is a bit more durable too.
But I really dig the chairs and saved them to my 'future projects' list.
Rick
If the process is more important than the result, you play. If the result is more important than the process, you work.
*********-ish
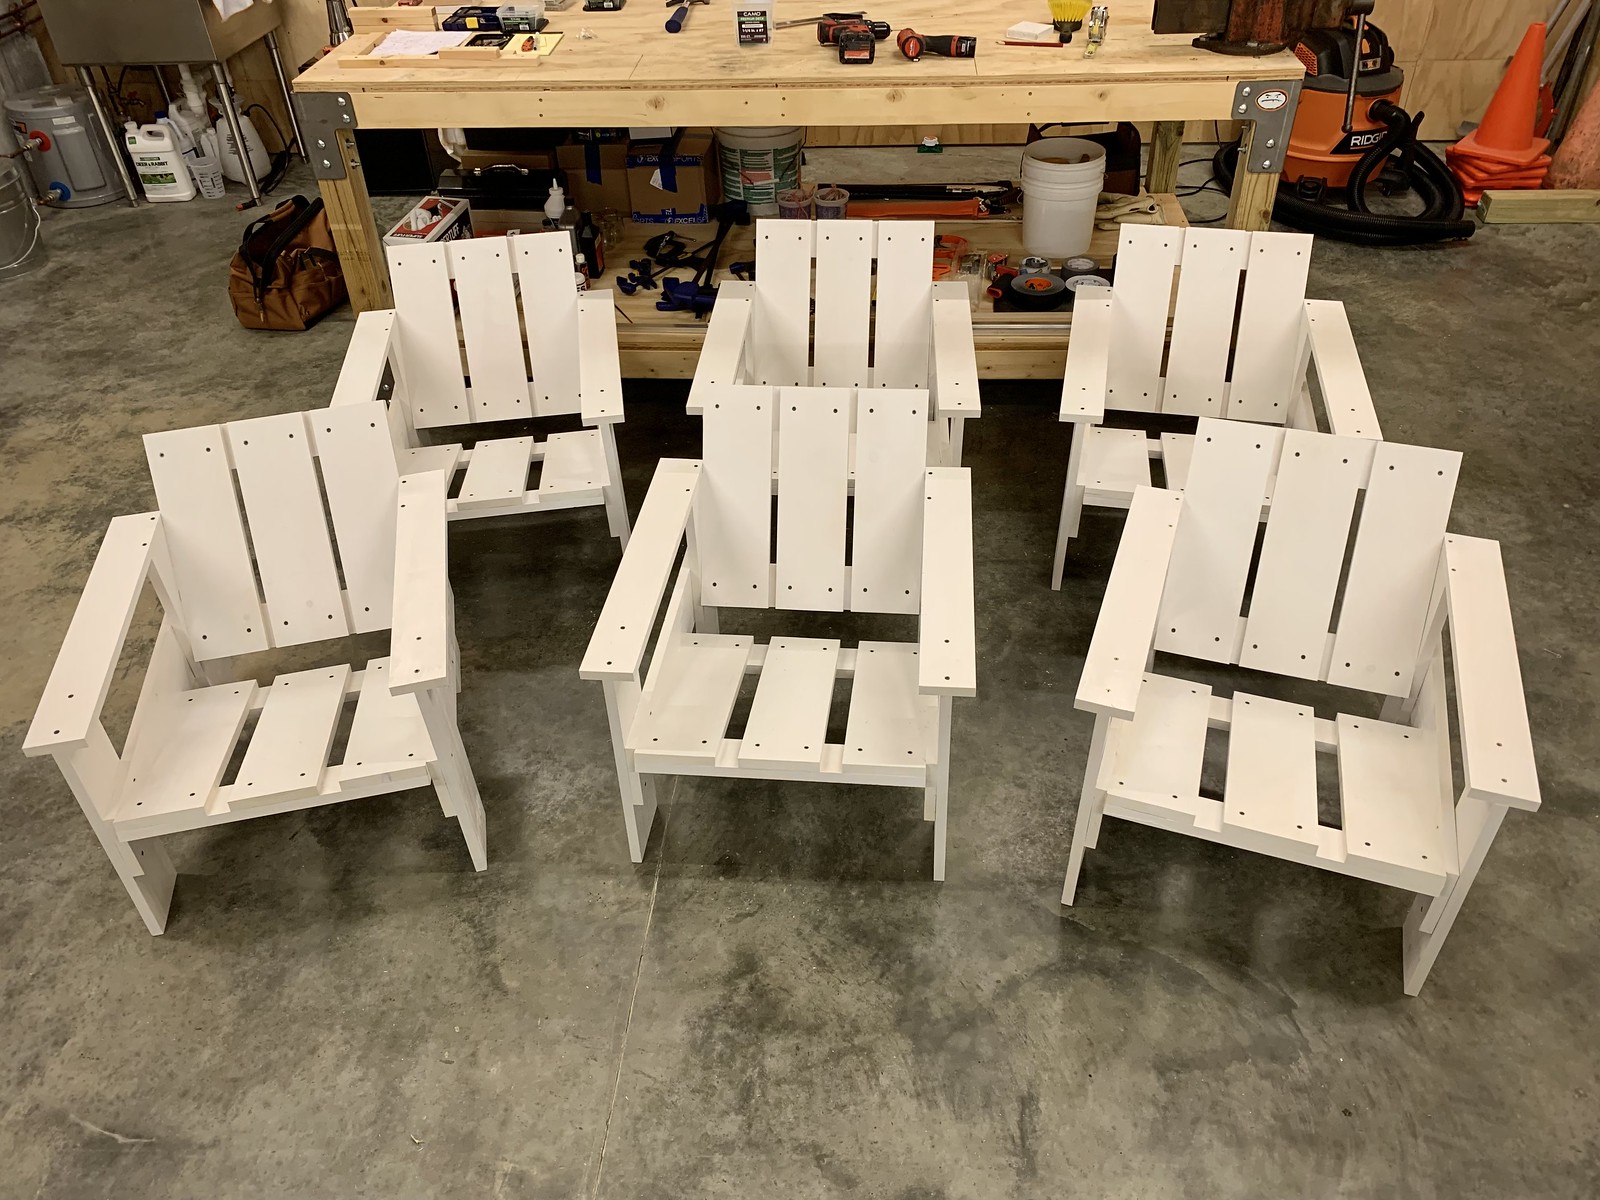
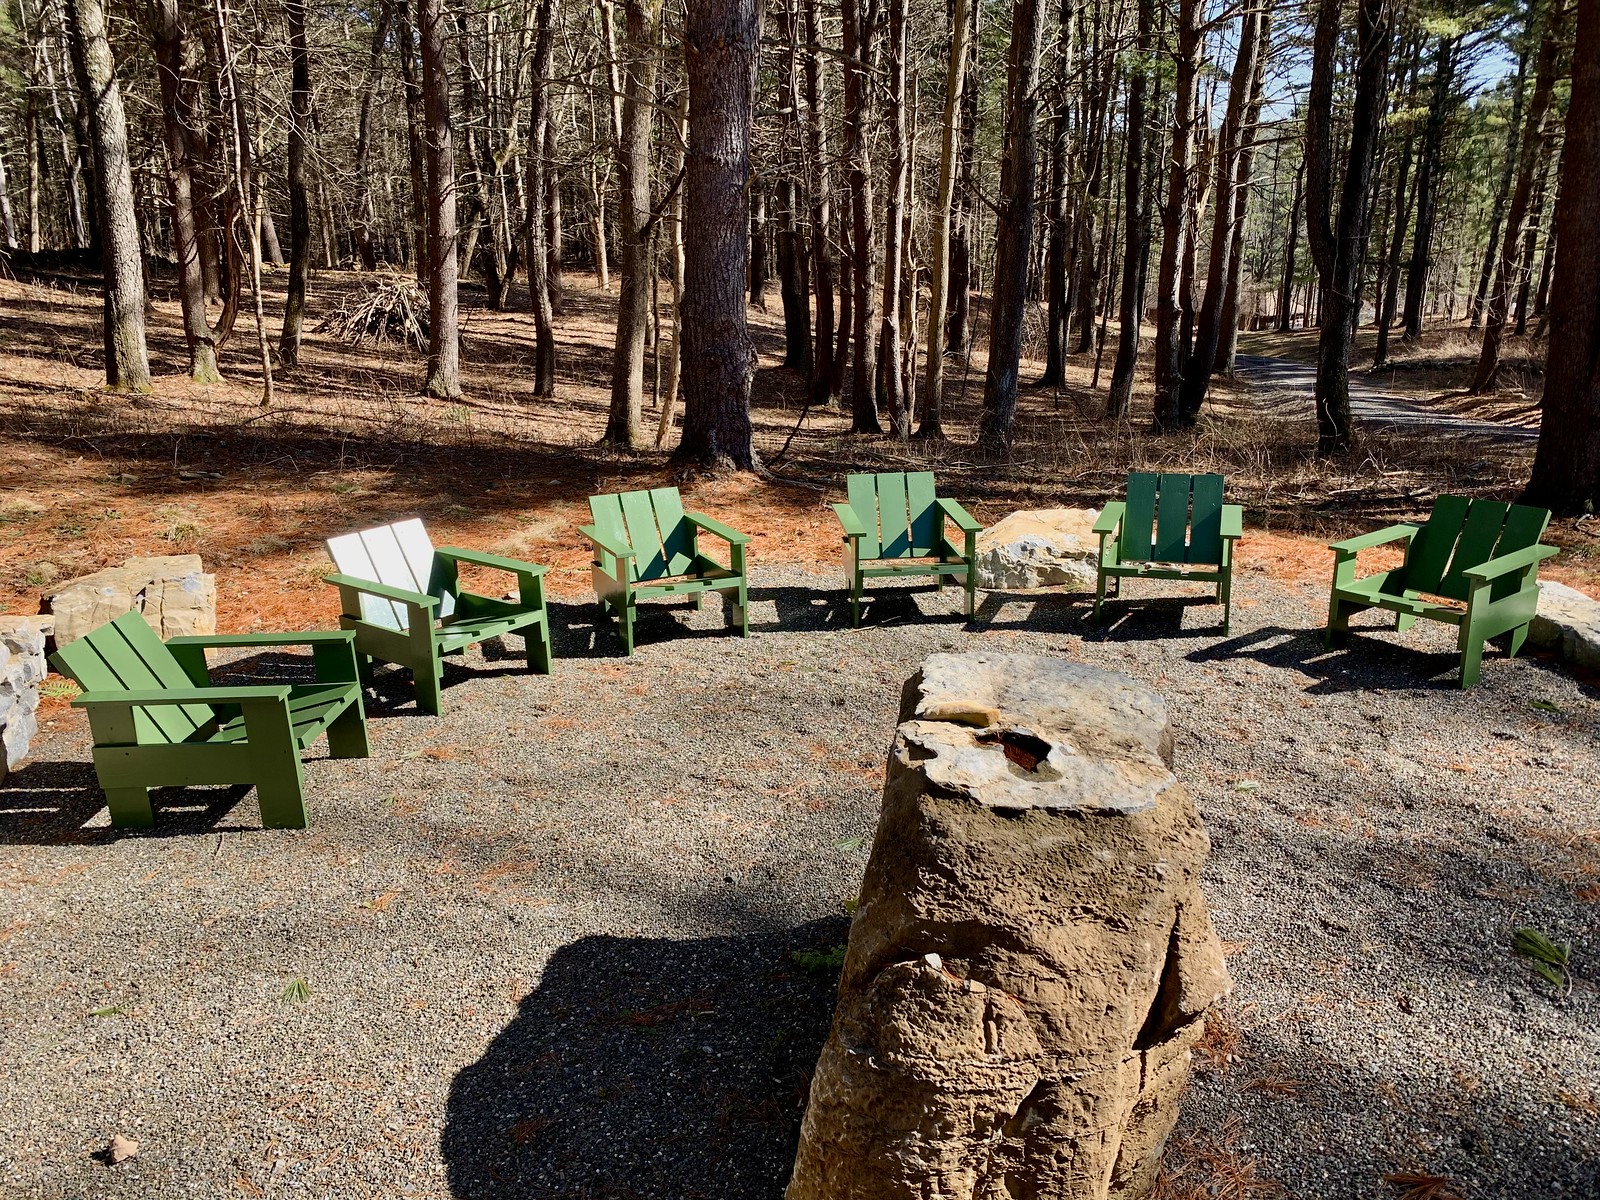
Okay, now I have 6 of them. I think we are going to paint them a shade of green called Sweet Basil. Need to figure out how to get my wife involved. It will need to be in the garage as the day time temps are going to be too low for a while.
Last edited by j44ke; 11-22-2021 at 07:56 PM.
Merckx
Very nice, Jorn.
Do you have any images showing the back view?
I'm having a hard time seeing how the back-rest section is supported at the aft end of the arm rests - you don't seem to have a crossbar there, which causes me to worry a bit about how loads will get from the back to the rest of the structure.
Woke Mobster

Strong work!
On my “lawn” furniture, I’ve screwed and glued a block to the bottom of each leg, a 2x2 with a notch cut out to make it an L section. Because the end grain rots pretty quick from ground contact. No hurry, you can always buzz 3/4” off from the legs in a year or two.
And sheeit, I’d leave the extra holes. It’s part of the damn process. Earned patina.
Will you publish your revised plans?
Last edited by thollandpe; 11-22-2021 at 08:54 PM.
Trod Harland, Pickle Expediter
Not everything that is faced can be changed, but nothing can be changed until it is faced. James Baldwin
*********-ish
There are three screws on either side - one at the top just below the arm, one through the two layers of wood off the side pieces and one (sort of) in between. I used longer screws here. They seem pretty stable. I did however hide a length of aluminum "L" on each side of the seat underneath.
The only weakness I am concern about is the armrests. I might put a triangle under the armrest at the rear to support the overhang there.
Thanks - good idea on the feet. Yes, I could publish some notes. There is a very good copy of Rietveld's drawings somewhere on the inter-webs. I need to re-find that copy and add my notes to that, because the drawings are clearer.
That's Mr. Bob To You
I think that you’ve earned a spray gun. No sense risking a carpal tunnel flare up with an old school brush…
rw saunders
hey, how lucky can one man get.
*********-ish
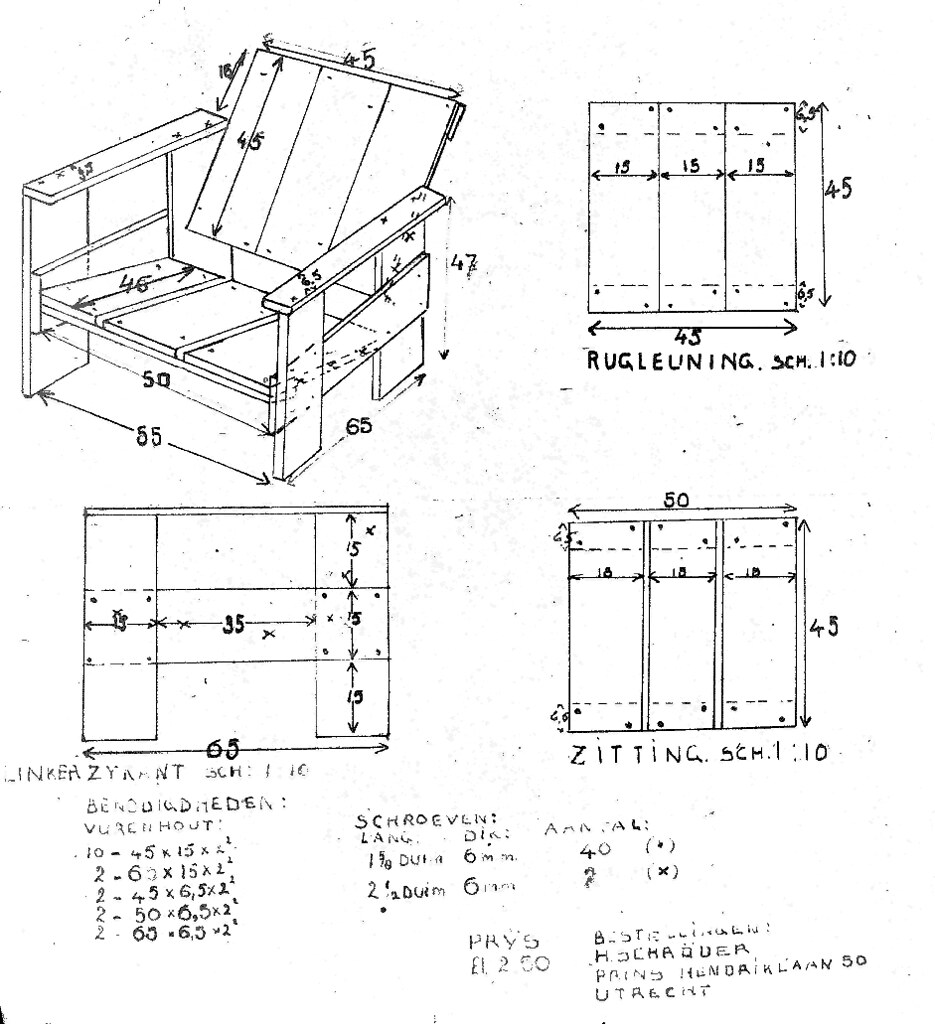
Here are the plans I used, stolen from someone who took them from somewhere else. The first ones are measured drawings evidently (who knows really) from an original chair. It is helpful especially because of the organized cut list (in metric dimensions.) The second drawings are Rietveld's drawings, and there are dimensions there that seem to corroborate the first drawing, but more importantly it shows more clearly where to put screws and how the seat and back line up with the side pieces of the chair.
I made some changes to measurements due to differences in lumber thickness and width. And I figured out some ways to make the assembly more straightforward by using reference points from the drawing. I'll see if I can transpose those onto one of these ^ drawings.
I also made several jigs. For each set of 4 screws holding the front and back legs to the side board, I made cut a square of wood the same size as the junction and drilled 4 holes 2cm from each side of their respective corners. Then I made a jig that allowed me to set two legs and one side board up centered & in proper configuration and used the jig to mark the screw locations. Then I drilled the holes and screwed it all together. Of course I checked alignment with square and measured to make sure the side board stayed centered on the legs. In the drawing, the side board leaves 15cm of the legs exposed above and below, but given US lumber dimensions, that was actually 15.5cm.
The other jig was for the two screws on the top and bottom of each of the seat and back slats. Mine execution still isn't perfectly lined up, but they are all spaced just about the same amount. I used the same spacing as the jig for the 4 screw jig above, so the screw holes are 2cm from the edges and a set distance apart. That creates a neater appearance even though some screws are not exactly on line.
The last jig just transposed the same 2 screw position as the above jig to the armrests. The back got in the way, so I just took a piece of 1x4 and notched it vertically so it would fit next to the back so I could mark where the screws should go.
As I said earlier, I widened the arm rests to 1x4, instead of using a 1x2 as per the drawings. Just seemed too narrow and provided no surface for resting a drink safely. But I may need to reinforce the armrests with some sort of triangular piece underneath.
Last edited by j44ke; 11-22-2021 at 10:37 PM.
Rouleur
these look good! do you have an approximate weight?
It may be a good idea to drill pilot holes for the aluminium tracks, then put each chair leg into separate containers of polyurethane overnight, let it dry, and then paint over it. whatever wicking there can be will be taken up by that.
*********-ish
Too late I think....
I did a lot of house painting. Trim work mostly. And then there was my art career. So I can work pretty quickly and cleanly. But I am trying to pull a Tom Sawyer on my wife. "Painting is relaxing. Almost a zen experience..."
*********-ish
I think they are 24" or thereabouts. I haven't actually measured the height! I'll do it when I am next in the garage.
Interesting idea with the urethane. Everything is already primed with exterior latex so might inhibit absorption of the poly. But I like the idea of "plasticizing" the feet.
When I lived in Richmond there was a lumberyard that did their own pressure treating. You could order whatever dimensional lumber you wanted, and they'd treat it. The Wave Hill chair is another Reitveld-based design, and the plans I had called for using 1x12's for the back and the seat. I called the lumberyard and they had them for me in a week. They used good pine too because otherwise (they said) it wasn't worth treating. That was over 20 years ago. Treated lumber gets used a lot in Virginia, but I don't think they are in business any longer.
Merckx
Good idea - right now since all four fasteners and the supporting legs are nearly in line the armrests won't be that great at taking roll direction loads.
You can be sure that at some point in this sort of chair's life someone will sit on an armrest instead of where they're supposed to sit, and possibly do some damage.
Woke Mobster
Didnt read this before posting about my version with the L block, my bad.
If you use aluminum youll need a capillary break or the bottom of the leg will be wet anyway. Water is a tricky adversary.
Trod Harland, Pickle Expediter
Not everything that is faced can be changed, but nothing can be changed until it is faced. James Baldwin
*********-ish
So Tyvek booties?
*********-ish
Okay, here are my notes transcribed from the scribbles on my workbench top. The whole bundle of images is located here.
First the Rietveld original drawing. I actually used the 2 1/2" screws only at front/back-top/bottom of the seat and back where I screwed through the side boards to hold the chair together. Other screws on sides and armrests were 1 5/8", and the slats and sides were 1 1/4". Give or take.
Next the measured drawing plus cut list, all metric. I changed the width of the seat to 49.2cm based on my trial and error, and then realized the Rietveld drawing above showed seat supports cut at 49cm. So adjust accordingly.
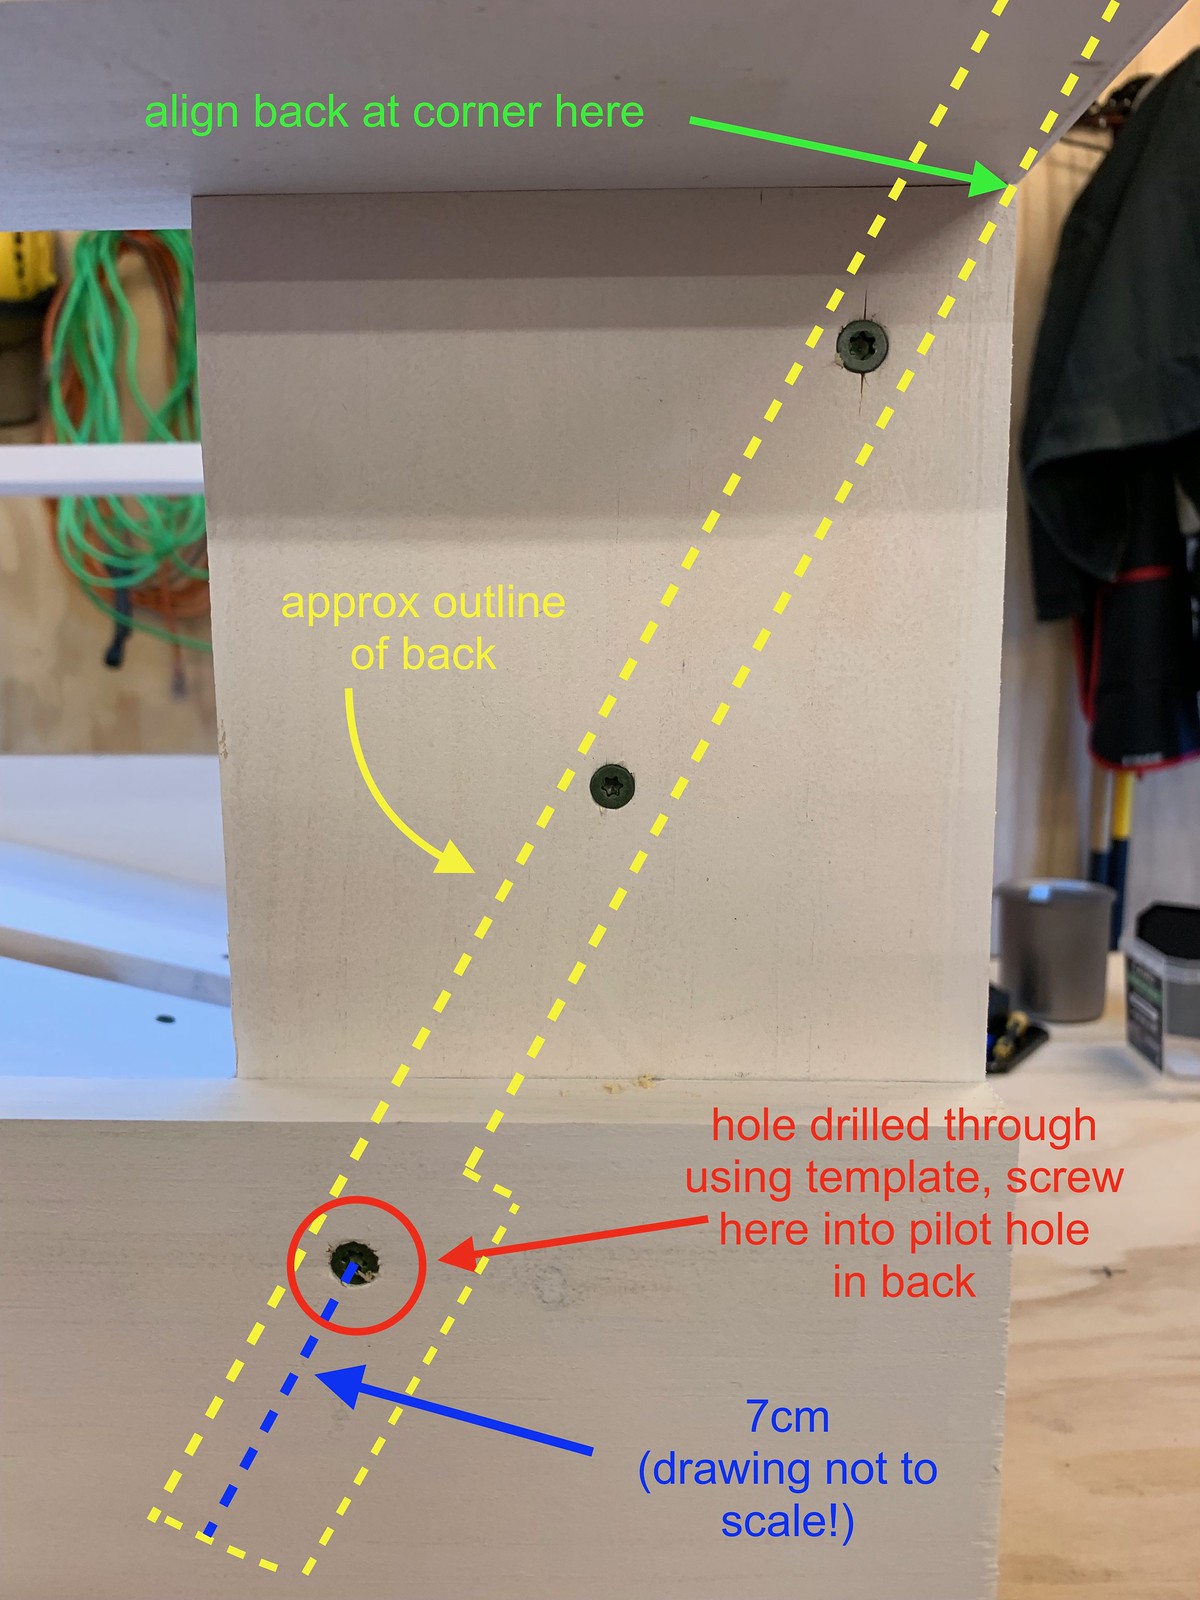
Here are the jigs I used for the pilot hole locations on the sides, seat and back slats and the armrests. I didn't drill the pilot holes with these, just marked the spots. The upper corners represented the attachment points for the front of the seat and the bottom of the back respectively. The sides are symmetric top to bottom (horizontal side board is centered on two vertical boards) so which hole you drill completely through each side is determined by which side the piece will be used on and whether it is the seat or back.
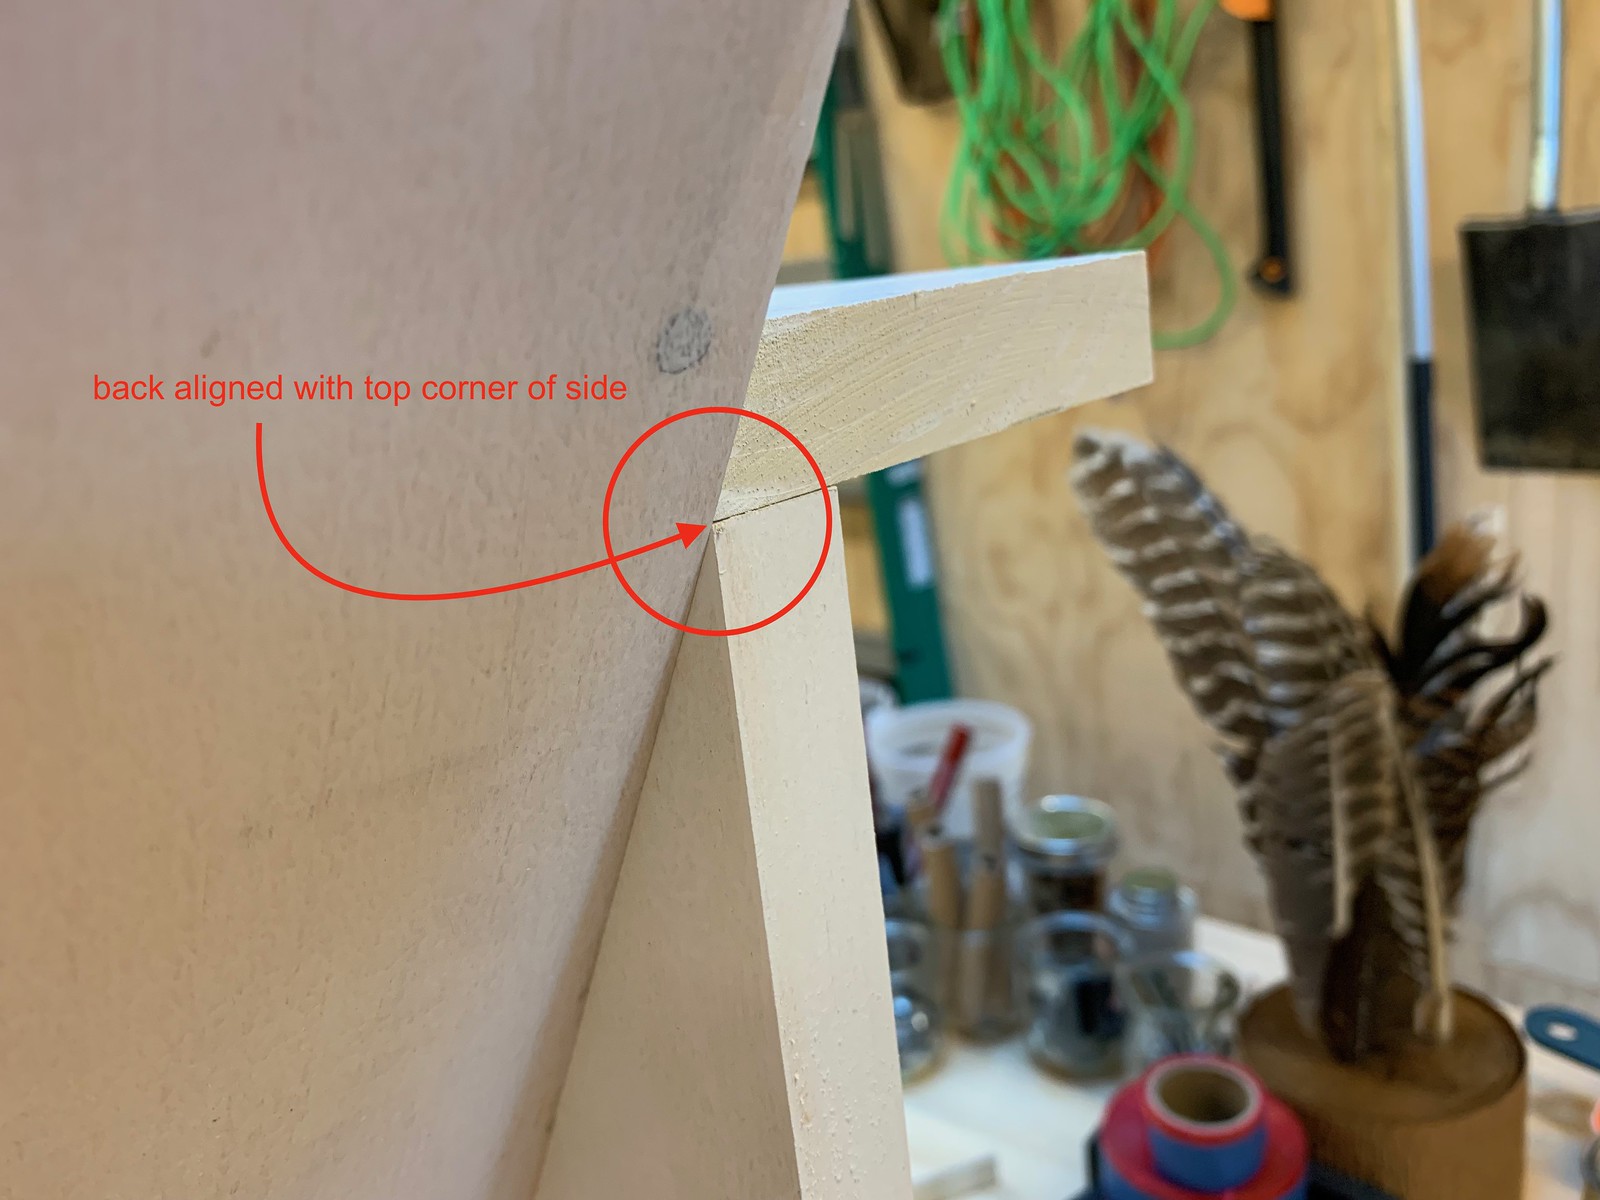
I started assembling the chair with the back. First I drilled a pilot hole 7cm up from the bottom of the facing slat on the back, and then I screwed the back to the side through the pilot hole. After that, I aligned the back with the top back corner of the vertical board on the side and put in the other two screws.
This is what I mean by alignment. Same on both sides. Gets the back angle right.
Attempt at an overview of the back from behind the chair.
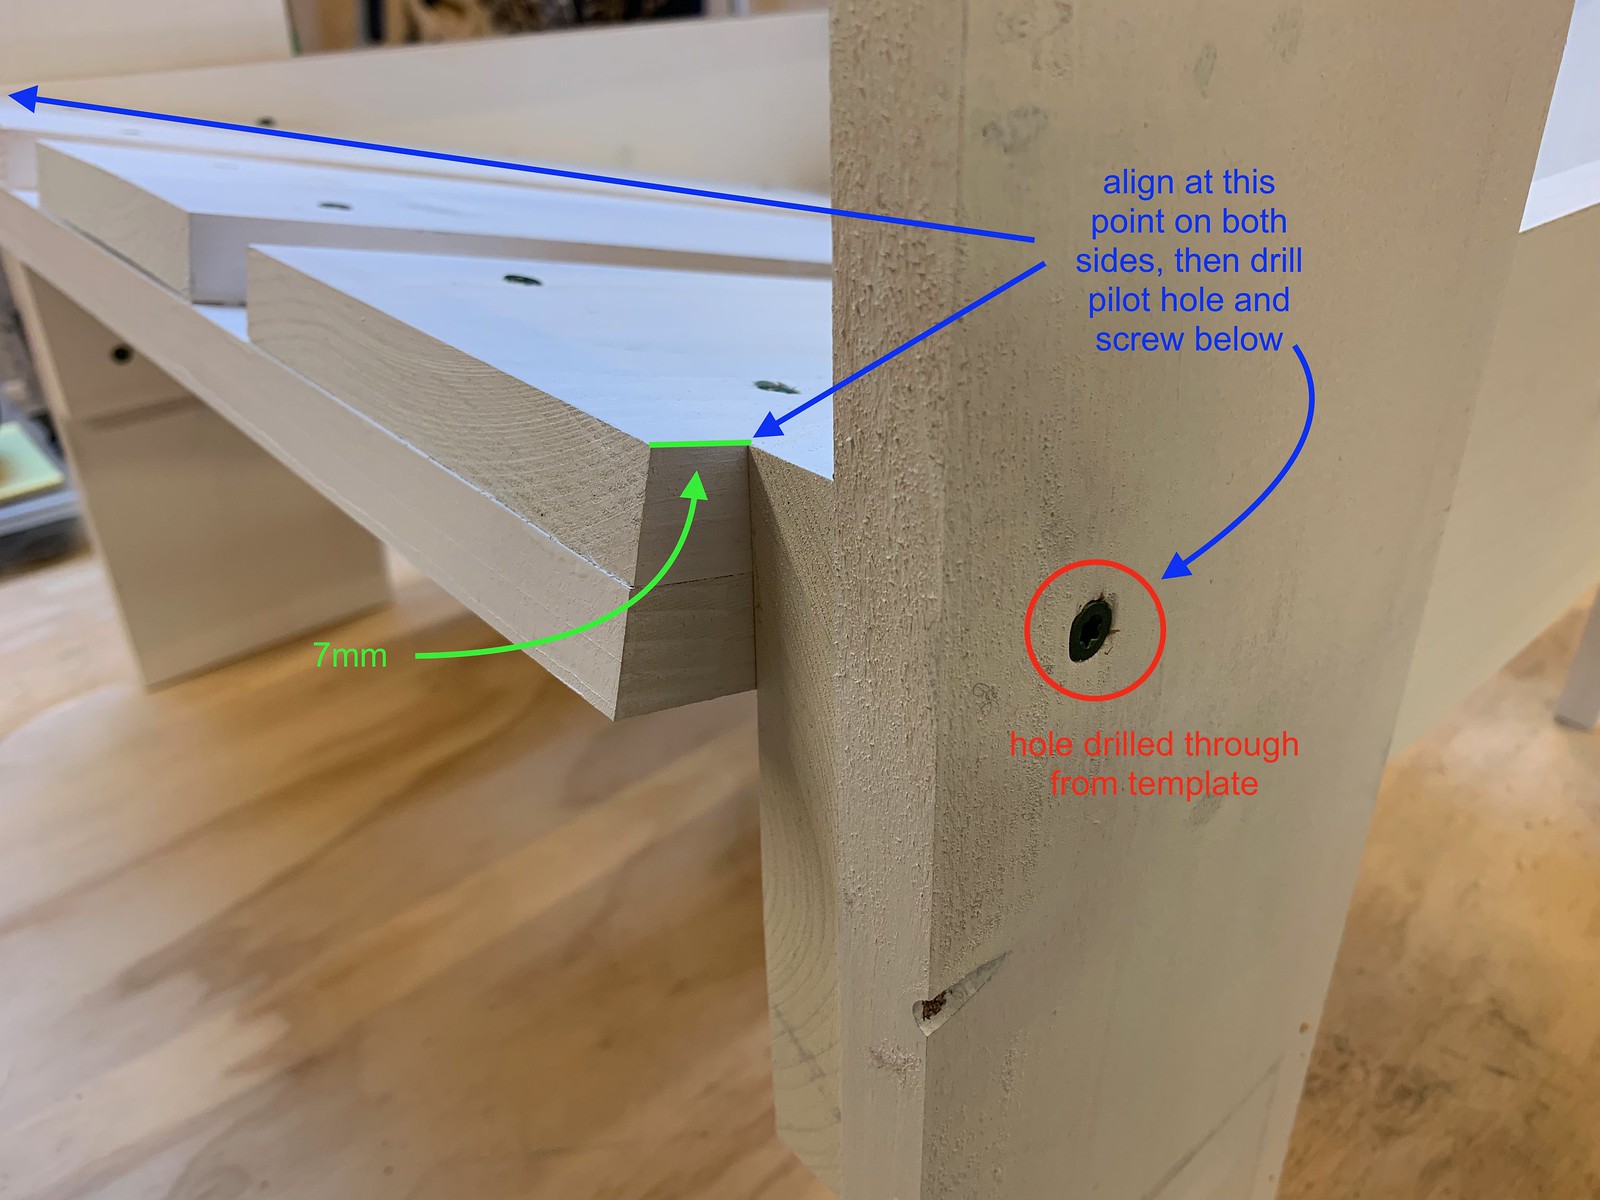
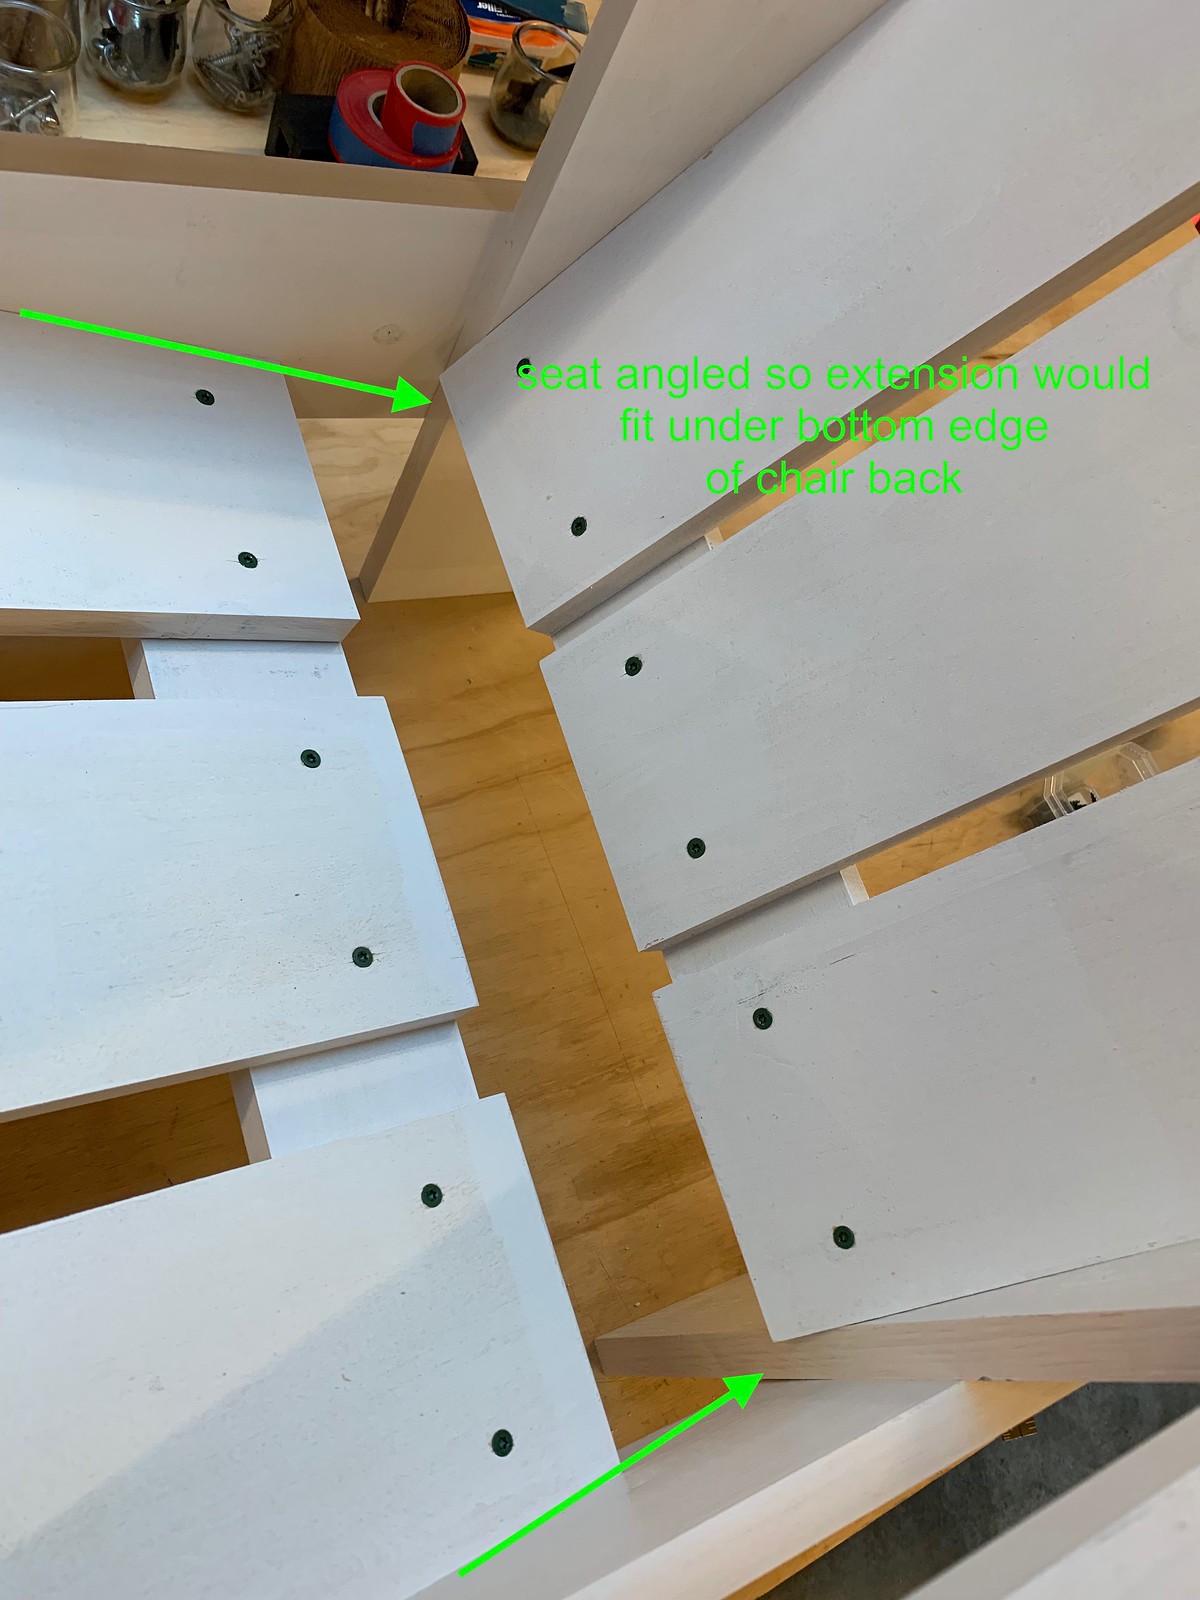
Seat slides in from the front with similar alignment points. Here, once I got everything aligned, I clamped the seat and drilled a pilot hole through the hole in the side. Then screwed it together. Seat sticks out less than either drawing, but I found this meant seat angle was correct and space between back of seat and bottom of back was much better.
Once I got the front of the seat screwed in, I angled the seat so the back edge was about 5mm from the bottom edge of the horizontal side board. And I installed an aluminum "L" to support the seat slats without adding a lot of external screws.

Last edited by j44ke; 11-24-2021 at 11:57 AM.
Grimpeur

Being Vsalon, lets have Silca 3d print some Ti feet for the chairs.
*********-ish
Rolls with style
Old downhill skis are useful for making chairs that look much better than they feel.
Dan Fuller, local bicycle enthusiast
*********-ish
*********-ish
Finish second coat. Had to wait until the temps got a bit higher. Paint was drying badly. Still could use a few days baking in the sun. Have some aluminum channel to cut into 24 sections to use for feet. But had a nice test drive today to watch the sunset.
Posting Permissions

 Reply With Quote


Bookmarks