User Tag List

Page 1 of 3 123 LastLast
Results 1 to 20 of 46

Thread: Fillet finishing - how to take it to the next level?

  1. #1
    Join Date
    Jun 2008
    Location
    Ottawa On
    Posts
    578
    Post Thanks / Like
    Mentioned
    0 Post(s)
    Tagged
    0 Thread(s)

    Default Fillet finishing - how to take it to the next level?

    Hi all,
    I've built 15 frames so far - all but two have been fillet. So I've had a bunch of practice finishing fillets. While my technique has greatly improved in both laying down and finishing fillets since the first ones i'm looking for any tips on how to take the final finish to the next level.

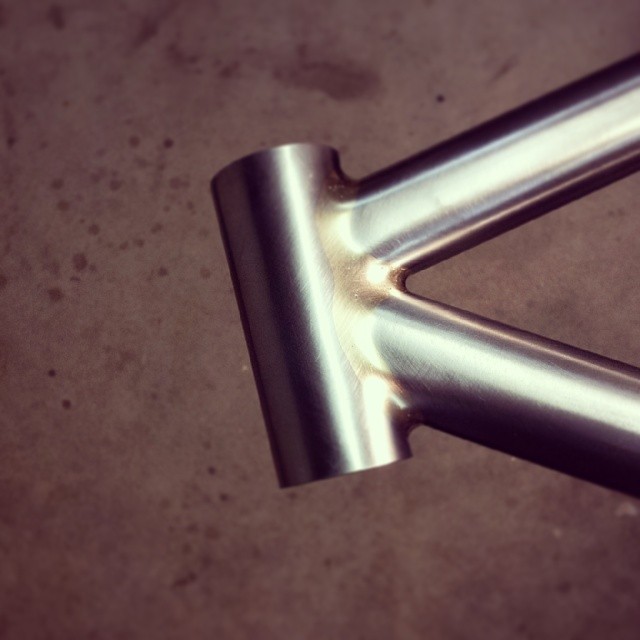
    I'm using 60 grit and getting really BORED after a few mins at 80 grit. Seeing the even brass to tube blending on these images makes me wonder if there are any secrets out there someone can fill me in on - or if it's just a 'more time' thing. I only use hand tools - so it's rat tail files and shop roll at the moment.
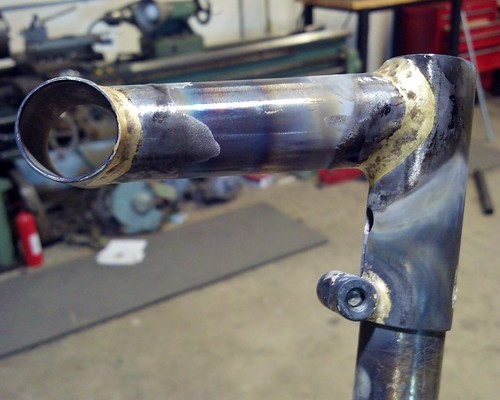

    ME
    Notice wavvvy lines at brass to tube transition


    THE GOAL (a tomii pic)


    To get the perfect blended edges is it now mostly patience? thanks for any advice you may have.

  2. #2
    Join Date
    Feb 2009
    Location
    State College, PA
    Posts
    5,605
    Post Thanks / Like
    Mentioned
    2 Post(s)
    Tagged
    0 Thread(s)

    Default Re: Fillet finishing - how to take it to the next level?

    Finishing a fillet is like laying a fillet- even radius, consistent width, and feathered edges. An imbalance in one shows in the others.


  3. #3
    Join Date
    Jul 2009
    Location
    Minneapolis, MN
    Posts
    603
    Post Thanks / Like
    Mentioned
    0 Post(s)
    Tagged
    0 Thread(s)

    Default Re: Fillet finishing - how to take it to the next level?

    Start with a large round 2nd cut file and get as close to the edges as possible without touching the tube. Next use a smaller smooth cut file to get even closer to the edges and get ride of those high wavy spots. Finally use 80 grit (good stuff) emery wrapped around a vinyl tube with a dowel in it. It's the turducken of fillet finishing tools.


    I have a few different sizes of these and use them often. The vinyl is soft enough that it provides some forgiveness so as not to cut too aggressively. It's basically an artificial finger.

    Don't go nuts with this; you can still remove steel pretty quickly and under-cut the tube. Close to the edges I use very little pressure.

    -Joel
    Joel Greenblatt

    Website

    Flickr

  4. #4
    Join Date
    Mar 2009
    Location
    worlds biggest island
    Posts
    1,927
    Post Thanks / Like
    Mentioned
    0 Post(s)
    Tagged
    0 Thread(s)

    Default Re: Fillet finishing - how to take it to the next level?

    I will quite often use belt sander belts cut up as they seem a lot more durable than some shop rolls.

  5. #5
    Join Date
    Mar 2011
    Location
    Australia
    Posts
    302
    Post Thanks / Like
    Mentioned
    0 Post(s)
    Tagged
    0 Thread(s)

    Default Re: Fillet finishing - how to take it to the next level?

    Quote Originally Posted by Clockwork View Post
    Finally use 80 grit (good stuff) emery wrapped around a vinyl tube with a dowel in it. It's the turducken of fillet finishing tools.
    I find wrapping emery paper around a piece of round balsa wood also works really well. The balsa is soft enough to give some give
    _______________________________________________
    Keith Marshall
    Kumo Cycles, ACT Australia
    Australian Cycle Design and Gasflux Distributor

  6. #6
    Join Date
    Aug 2013
    Posts
    29
    Post Thanks / Like
    Mentioned
    0 Post(s)
    Tagged
    0 Thread(s)

    Default Re: Fillet finishing - how to take it to the next level?

    I like a piece of windshield wiper. Cut the wiper bit off and you have a nice springy, rubber coated rod.

  7. #7
    Join Date
    Feb 2009
    Location
    State College, PA
    Posts
    5,605
    Post Thanks / Like
    Mentioned
    2 Post(s)
    Tagged
    0 Thread(s)

    Default Re: Fillet finishing - how to take it to the next level?

    I use my fingers.

  8. #8
    Join Date
    Aug 2011
    Location
    Beechworth, VIC
    Posts
    2,527
    Post Thanks / Like
    Mentioned
    9 Post(s)
    Tagged
    0 Thread(s)

    Default Re: Fillet finishing - how to take it to the next level?

    Quote Originally Posted by Kumo Cycles View Post
    I find wrapping emery paper around a piece of round balsa wood also works really well. The balsa is soft enough to give some give
    Me too.

  9. #9
    Join Date
    Jun 2008
    Location
    Minneapolis, MN
    Posts
    1,855
    Post Thanks / Like
    Mentioned
    2 Post(s)
    Tagged
    1 Thread(s)

    Default Re: Fillet finishing - how to take it to the next level?

    All good tips. Another that I'd add is an auto body trick called a guide coat. After you've finished the fillets rattle can some paint on them. Now sand off the paint as if you're finishing the fillets more completely. Low spots, pin holes, undercutting, etc. will be highlighted by the remaining paint. Guide coats are used often in the auto body world but I wouldn't recommend them as a standard procedure in frame building. It's just a useful tool to understand where you need to improve and to develop your eye. My first job in the industry was working for a frame builder than only fillet brazed. All I did for six months 40 hours a week was grind and sand fillets and machine frames. Wax on wax off.

  10. #10
    Join Date
    Jul 2011
    Location
    Hershey, Pa
    Posts
    2,286
    Post Thanks / Like
    Mentioned
    0 Post(s)
    Tagged
    0 Thread(s)

    Default Re: Fillet finishing - how to take it to the next level?

    Quote Originally Posted by Curt Goodrich View Post
    All I did for six months 40 hours a week was grind and sand fillets and machine frames. Wax on wax off.
    The unavoidable truth.
    Will Neide (pronounced Nighty, like the thing worn to bed)

    Webpage : : Flickr : : Tumblr : : Facebook
    Instagram: wilco_cycleworks

  11. #11
    Join Date
    Aug 2008
    Location
    Flagstaff, Arizona
    Posts
    11,159
    Post Thanks / Like
    Mentioned
    11 Post(s)
    Tagged
    0 Thread(s)

    Default Re: Fillet finishing - how to take it to the next level?

    IMG_2681.jpgIMG_2512.JPGIMG_2503.JPGIMG_2030.JPG
    Quote Originally Posted by timto View Post
    Hi all,
    I've built 15 frames so far - all but two have been fillet. So I've had a bunch of practice finishing fillets. While my technique has greatly improved in both laying down and finishing fillets since the first ones i'm looking for any tips on how to take the final finish to the next level.


    To get the perfect blended edges is it now mostly patience? thanks for any advice you may have.
    Your waves are differences in your high & low spots, and varying radii.
    Here is the level I polish to - it takes many hours to get the eye for it.
    - Garro.
    Steve Garro, Coconino Cycles.
    Frames & Bicycles built to measure and Custom wheels
    Hecho en Flagstaff, Arizona desde 2003
    www.coconinocycles.com
    www.coconinocycles.blogspot.com

  12. #12
    Join Date
    Jun 2008
    Location
    Ottawa On
    Posts
    578
    Post Thanks / Like
    Mentioned
    0 Post(s)
    Tagged
    0 Thread(s)

    Default Re: Fillet finishing - how to take it to the next level?

    Thanks all. I appreciate knowing the waves are high and low still. really like the rubber tube tip! Thanks guys

  13. #13
    Join Date
    May 2011
    Location
    Cape Girardeau,Missouri
    Posts
    342
    Post Thanks / Like
    Mentioned
    0 Post(s)
    Tagged
    0 Thread(s)

    Default Re: Fillet finishing - how to take it to the next level?

    Not disrespecting the great tips above (I'm going to try the tube/dowel as I've tried the balsa and end up smushing it)
    but the recent thread http://www.velocipedesalon.com/forum...ers-35998.html discusses some mechanical aids to be used before final sanding perhaps.
    I get some mileage out of sanding cones I get at HF. 52 Piece Sanding Cone Set
    cheers
    andy walker

  14. #14
    Join Date
    Jun 2008
    Location
    Minneapolis, MN
    Posts
    1,855
    Post Thanks / Like
    Mentioned
    2 Post(s)
    Tagged
    1 Thread(s)

    Default Re: Fillet finishing - how to take it to the next level?

    Quote Originally Posted by afwalker View Post
    Not disrespecting the great tips above (I'm going to try the tube/dowel as I've tried the balsa and end up smushing it)
    but the recent thread http://www.velocipedesalon.com/forum...ers-35998.html discusses some mechanical aids to be used before final sanding perhaps.
    I get some mileage out of sanding cones I get at HF. 52 Piece Sanding Cone Set
    cheers
    andy walker
    I typically start with those in my die grinder. You will not be able to finish a fillet with those. Still going to need to finish by hand. It's a great way to go for speed like most power tools. They can also remove material faster than expected. I'm not saying don't try them. Just proceed with caution. Also, if you don't do your own paint try the guide coat technique. Too often painters fix fillets without the knowledge of the builder. The frame looks great but the credit belongs to the painter rather than the builder.

  15. #15
    Join Date
    Feb 2013
    Location
    Glasgow, Scotland
    Posts
    303
    Post Thanks / Like
    Mentioned
    0 Post(s)
    Tagged
    0 Thread(s)

    Default Re: Fillet finishing - how to take it to the next level?

    A quick way to do a guide coat on smaller areas is with permanent marker.

  16. #16
    Join Date
    Aug 2008
    Location
    Minnesota
    Posts
    515
    Post Thanks / Like
    Mentioned
    0 Post(s)
    Tagged
    0 Thread(s)

    Default Re: Fillet finishing - how to take it to the next level?

    Quote Originally Posted by afwalker View Post
    Not disrespecting the great tips above (I'm going to try the tube/dowel as I've tried the balsa and end up smushing it)
    but the recent thread http://www.velocipedesalon.com/forum...ers-35998.html discusses some mechanical aids to be used before final sanding perhaps.
    I get some mileage out of sanding cones I get at HF. 52 Piece Sanding Cone Set
    cheers
    andy walker
    Yep...I use some like those a lot, although I typically use coarser ones (60 grit), and use them on my 1/8" rotary tool at low speed. I especially like the cone shapes for the bb shell "crotches". I did the bb shell area below just a couple of days ago. Its not the best picture, but you can see the texture is different in the crotches where I used the rotary tool. I use Half inch shop rolls on other joints to speed up the initial material removal. Its hard to explain, but I hold the tool in such a way that I kind of rotate it into the joint, almost like carving it, etc. I always do the final finishing by hand though with 80 grit backed up with files and my fingers.

    Dave

    PS: Don't ya just love fillet brazed joints!? I build a lot of lugged bikes, but there's nothing like a good fillet.

    Dave Anderson
    Anderson Custom Bicycles
    www.andersoncustombicycles.com
    ACB on Facebook
    ACB on flickr

  17. #17
    Join Date
    Dec 2009
    Location
    Niles, Michigan
    Posts
    609
    Post Thanks / Like
    Mentioned
    0 Post(s)
    Tagged
    0 Thread(s)

    Default Re: Fillet finishing - how to take it to the next level?

    photo[3].jpg
    Hi Tim, it shouldn’t take a long time to file a fillet to near perfection. The final 10% can swallow a lot of time. I’m including a picture of a practice braze I did this week to help teach Jesse - who is going over to our frame shop in Ukraine to make some fillet brazed utilitarian bicycles. The tubes we are using are long so we can cut off and miter a short end piece of a top tube and braze them onto the end of the extra long down tube. The long end of this “hockey stick” can be moved around easily to keep it in just the right position while brazing. Of course good brazing makes filing much easier.

    I spent only about 10 minutes filing and emorying this example – and 5 of that was just getting rid of flux so it would look better in a picture. The other 5 I was using an 8” 2nd cut round file with a Scroz-on wooden handle. In addition I sometimes used a 4” half round. I’ve got Dynafile hand belt sanders with different belt widths and know how to use them but seldom do to get a first rate job.

    The filing motions that I use are complex. It involves rotating the file in my hand with a forward motion while simultaneously sliding it sideways. While the file is moving forward, the stroke itself on the fillet is only going slightly sideways. The cut is going left to right in a line and not rotating around the fillet. Get it? The important thing is that this motion is done in a repeated series of motions with just a slight advance around the fillet with each stroke. In fact there should be no space in-between these strokes. Of course the file is being held with both hands. Sometimes my dominant right hand is on the handle and sometimes it is in the middle of the file (especially when I am going round the ears of the miter and need to use shorter strokes). My left hand is usually on the end although if my right hand is on the handle, the other might be closer in.

    Lets take a moment to illustrate this file motion on a rusted or painted scrap round tube. Just to be clear we aren’t near any joints now. What my stroke in this situation is not going to do is rotate around the tube. It will cut a single straight thin line going left to right (because I am right handed) along its crown. It will look like a simple straight line. My file motion uses half to 3 quarters of the file length moving forward while simultaneously moving to the right. The cut of the tube is only going to the right. Now on the next stroke I very incrementally rotate my file slightly forward and do the same sliding sideways stroke again. There should be no space whatsoever between this stroke and the many more you are about to do. Maybe in the space of 3 mm you would have made 20 strokes. It is like gears of a clock moving its hands or the needle on a record slowly making it way to the center. This pattern catches all the high spots and its even tight consistency prevents divots or channels. This basic stroke is used in many applications including thinning lugs.

    I have discovered that the majority of my framebuilding class students can’t catch on to this filing pattern right away. Neither has it ever crossed their minds to do it this way. Often my demonstrations have to be constantly repeated. They have trouble getting the hang of filing sideways with a forward motion. In addition the tight control of evenly and very closely spacing strokes doesn’t come naturally to them. What they tend to do is create a U with a straight forward stroke. Or the file goes sideways without any forward movement. Or there is way to much file rotation between strokes. It is easy to screw up in so many ways.

    It is also important to understand the amount of force or power that needs to be applied to each stroke. While in the fillet, it is not evenly applied across the entire stroke. One can tell by the sound if enough force is used. I’m not a musician that can give you the note on a scale but it is a deeper sound while in the middle and gets higher as your pressure lightens as it gets to the edge. I start the stroke slightly to the left of center and apply power in the middle where most brass needs to be removed and lighten up as I reach the edge. Once I’ve made 20 or so strokes (I always move the work so my motions are comfortable), I go back and start the doing the other side from the center. My motion will now either be right to left or I will turn either myself or the frame around so I’m filing the other side from the fillet’s middle.

    The toughest part to file and not hit things you shouldn’t is around the ears of the miter so I start there 1st to establish my fillet width and concave depth. One has to be careful not to gouge into the tubing itself outside of the fillet. However, it is impossible for the file not to need to slide over the tubing just beyond the brass. It is just a matter of careful application of force to just get rid of file marks that has feathered out the brass.

    Once the shape is achieved, it is time to remove the file marks. There are several ways to do this but I like to use Swiss Pattern #1 and #2 cut files. I file with the same motion as my courser files that did all the shaping. With these I’m just getting rid of marks. Without those fancy files lighter strokes work too. After that I use #80 grit emory cloth. Sometimes I tear thin strips and use a shoe-shine motion but usually I’m polishing with my fingers behind the emory.

    This post is really long but in fact I’ve only barely covered the basics. There is a lot more I could write. I often leave out stuff because I want my framebuilding students to have better information to get better results than those that think they can do it themselves with the internet as their instructor. In my opinion, filing is more difficult to get just right than brazing.

    Doug Fattic
    Niles, Michgian

  18. #18
    Join Date
    Nov 2009
    Location
    Brisbane, Qld. Australia
    Posts
    2,268
    Post Thanks / Like
    Mentioned
    0 Post(s)
    Tagged
    0 Thread(s)

    Default Re: Fillet finishing - how to take it to the next level?

    In my mind the fillet brazed frames are probably the pinnacle of the craft. The work shown above is just ridiculously good. Thanks on behalf of the OP for sharing the the little things guys.
    __________________________________________

    "Even my farts smell like steel!" - Diel

    "Make something with your hands. Not with your money." - Dario

    Sean Doyle

    www.devlincc.com

    https://www.instagram.com/devlincustomcycles/

    https://www.flickr.com/photos/139142779@N05/

  19. #19
    Join Date
    Dec 2009
    Location
    Niles, Michigan
    Posts
    609
    Post Thanks / Like
    Mentioned
    0 Post(s)
    Tagged
    0 Thread(s)

    Default Re: Fillet finishing - how to take it to the next level?

    Attachment 63785
    Here is a picture of a brass fillet cycle-cross frame one of my students Cale finished last week in my framebuilding class. Like almost all students he hadn’t learned to braze before class started. My teaching assistant Herbie Helm was primarily his brazing tutor. I go over the principles of brazing as well as the specifics of how to do each joint before a demonstration is given. Afterwards I showed him how to file and use the lathe to make the binder bolt. He did 2 practice joints before starting on this frame. This is an illustration that doing a good fillet brazing job is not that far out of reach from zero with proper instruction. Sometimes Herbie and I have to help those born with lesser talents (we can’t all sing on tune or in my case learn Russian quickly) but Cale was able to braze and file his fillet brazed joints all by himself.

    I have both oxyacetylene and oxypropane in my shop. Cale choose to use propane with an oxygen concentrator because of their convenience and cost. He is a bicycle shop mechanic so both setup price and operating costs are important to him. I told him before he started that oxyacetylene has a bit of an advantage when doing fillet brazing because it has a sharper, hotter flame (which helps with precision heat control). However in my experience it doesn’t make that much difference. We use propane for the frames we build in Ukraine and I used it for the sample in my earlier post.

    The torch we used was a Uniweld 71 with a Victor UN-J mixer elbow and TEN-2 tip. The TEN screw-on tips are designed to be used with propane (as is the mixer/elbow) and have a recess on the end of the orifice to help keep the flame attached. Herbie and I prefer using the Victor size #2 tips for fillet brazing with propane instead of a bigger #3 because the larger tip makes specific area heat control more difficult. My oxygen concentrator is a DeVilbiss 5 liter per minute model.

    Doug Fattic
    Niles, Michigan (and sometimes Bucha, Ukraine)

  20. #20
    Join Date
    Mar 2009
    Location
    Tulsa, Oklahoma, United States
    Posts
    2,983
    Post Thanks / Like
    Mentioned
    0 Post(s)
    Tagged
    0 Thread(s)

    Default Re: Fillet finishing - how to take it to the next level?

    Quote Originally Posted by bencooper View Post
    A quick way to do a guide coat on smaller areas is with permanent marker.
    One more use for a Sharpie
    Eric Doswell, aka Edoz
    Summoner of Crickets
    http://edozbicycles.wordpress.com/
    http://www.flickr.com/photos/edozbicycles/
    In Before the Lock

Page 1 of 3 123 LastLast

Similar Threads

  1. Idea for finishing, will it piss off a painter?
    By veryredbike in forum The Frame Forum@VSalon
    Replies: 3
    Last Post: 05-04-2013, 11:39 PM
  2. One More Level
    By jamesand in forum The OT
    Replies: 4
    Last Post: 02-12-2012, 12:52 AM
  3. Frame finishing survey. I would be greatly appreciative!
    By dbohemian in forum The Frame Forum@VSalon
    Replies: 54
    Last Post: 08-24-2010, 12:41 PM
  4. Custodian OS level top tube lugs now available
    By Dazza in forum The Frame Forum@VSalon
    Replies: 0
    Last Post: 07-17-2010, 10:52 PM

Bookmarks

Bookmarks

Posting Permissions

  • You may not post new threads
  • You may not post replies
  • You may not post attachments
  • You may not edit your posts
  •