User Tag List

Page 1 of 2 12 LastLast
Results 1 to 20 of 23

Thread: DIY Curing Oven

  1. #1
    Join Date
    Aug 2011
    Location
    Beechworth, VIC
    Posts
    2,527
    Post Thanks / Like
    Mentioned
    9 Post(s)
    Tagged
    0 Thread(s)

    Default DIY Curing Oven

    I decided to refurbish my curing oven and ended up rebuilding it from scratch. I've only used materials and parts available at my local hardware or bought off Ebay, so this should be fairly easily reproducible but before starting your own wait for the "what I'd do differently next time" bit at the end. Lessons were learned along the way.


    002 by Markwine, on Flickr

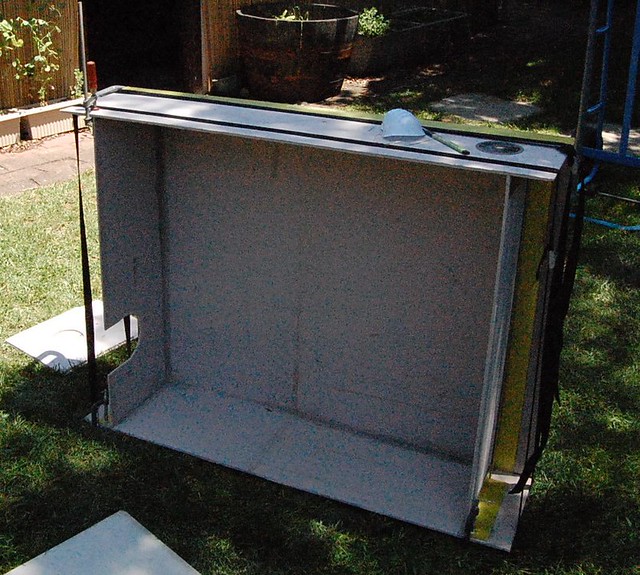
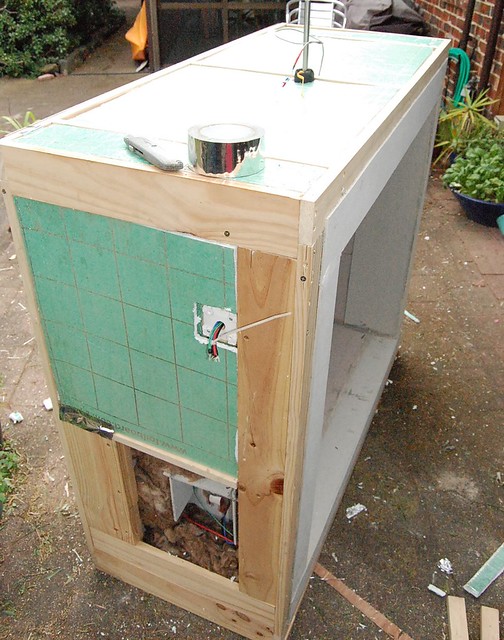
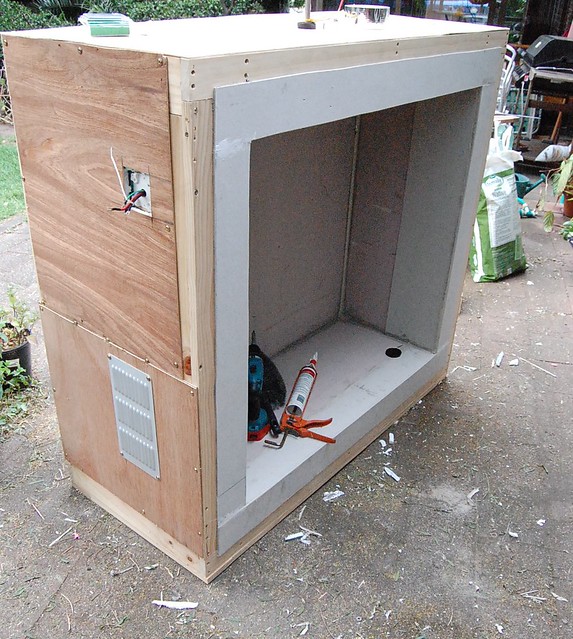
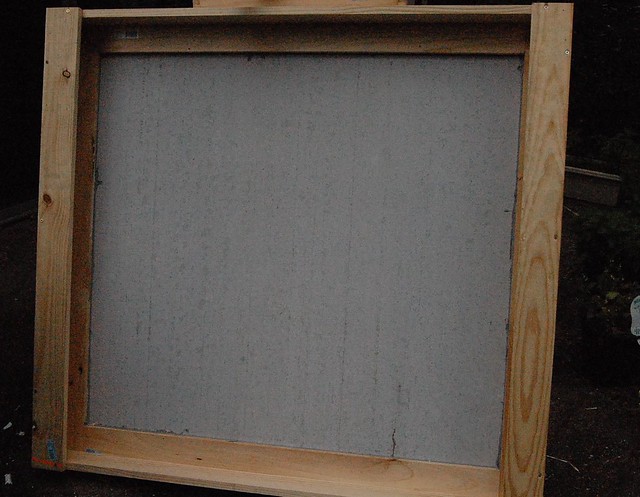
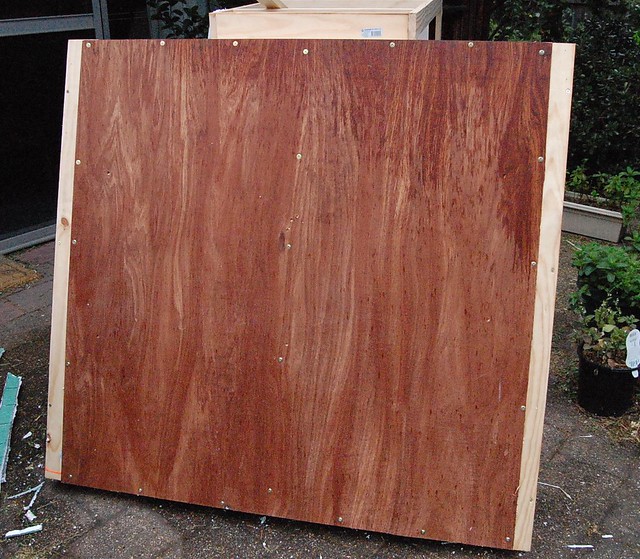
    The inner chamber is 1000 long x 900 high x 400 deep, large enough to fit an entire frame with enough room for vacuum bags etc. It is constructed of ordinary fibre cement sheeting stuck together with bathroom silicone, this being the best high temperature glue easily available (and the cheapest). Silicone is a very weak adhesive so joints were designed to be stressed in shear wherever possible, with generous overlaps. Steel angle reinforcements were used where necessary - the steel used is the cheap backing angle that plasterers use.

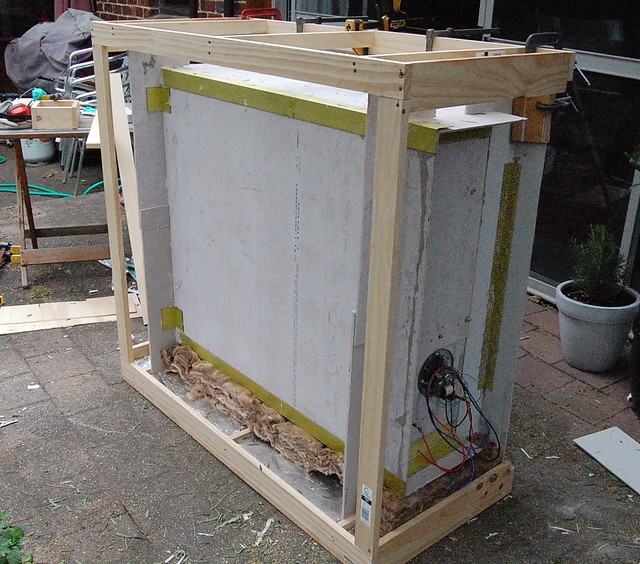
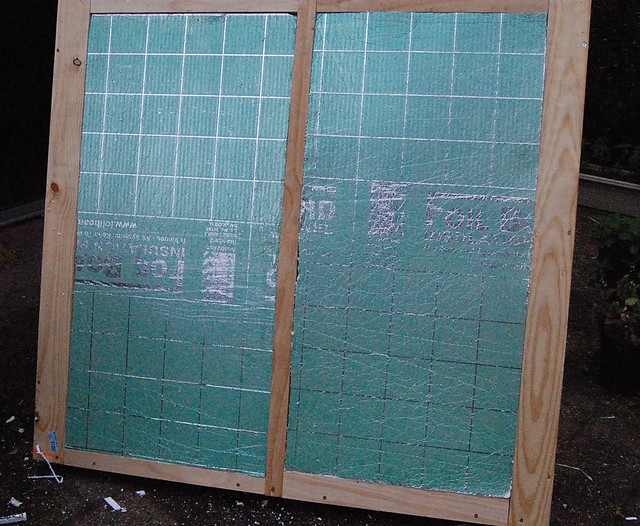
    In theory the chamber surface area of approx 3.3 m^2 insulated with a single layer of R 2.0 rockwool should mean that a heater of a mere 165 watts will achieve 100 degrees above ambient. In practice with the previous oven that was not the case, mainly due to air leaks. The inner chamber was thus designed to sit inside a wooden frame and a second layer of foilboard insulation added outside.


    005 by Markwine, on Flickr

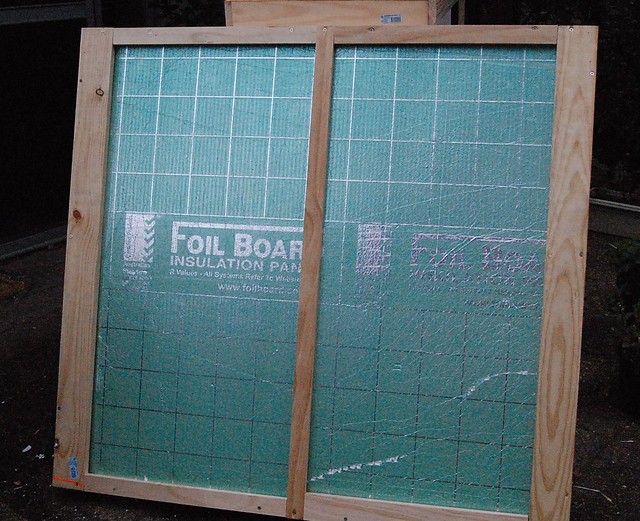
    I got some sheets of 15mm foilboard cheap from the local hardware so I used three layers. You can see the foilboard on the bottom here:


    006 by Markwine, on Flickr

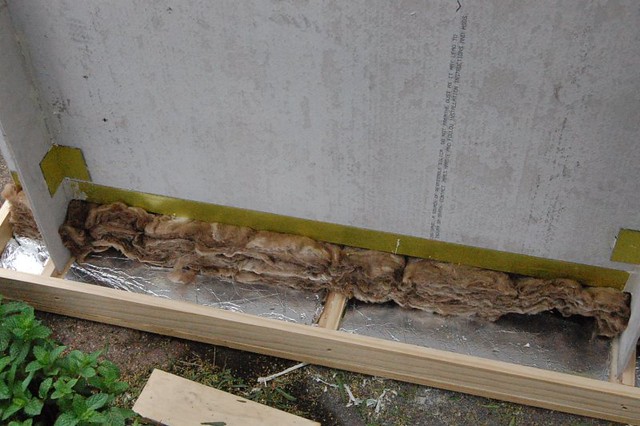
    Important technical diversion (contains equations but you should still read this):

    EPS is a good insulator but it has a fairly low maximal service temperature, about 80C which is a bit of a drawback in an oven. It is therefore important to match the R values of the inner and outer layers of insulation so the temperature tolerance of the EPS is not exceeded. The temperature at the interface between the inner and outer insulation layers is given by

    T interface = T ambient + (R outer layer / (R inner layer + R outer layer) x (T oven - T ambient).

    For T oven = 120, T ambient = 40 (easily achieved here in summer) to keep T interface below 80 requires R outer to be <=0.5 x (R inner + Router) which is obviously equivalent to R outer = R inner.

    I went one step further and worked on a max service temperature of 70 C which gives R outer <= 0.375 x (R inner + R outer)With R inner = 2.0, this requires R outer to be <= 1.2. The foilboard I used has an R value of 0.37, so three layers will add up to around 1.2 so we're all good. This also means that anything else which has a low max service temperature temperature (like standard PVC insulated wiring) can safely be used as long as it is outside the inner layer of inulation.

    / diversion.

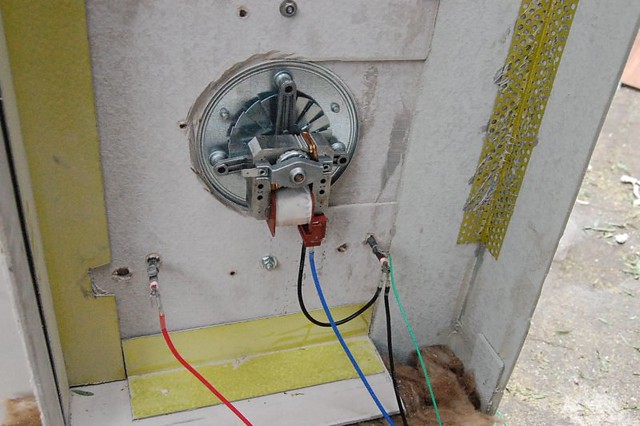
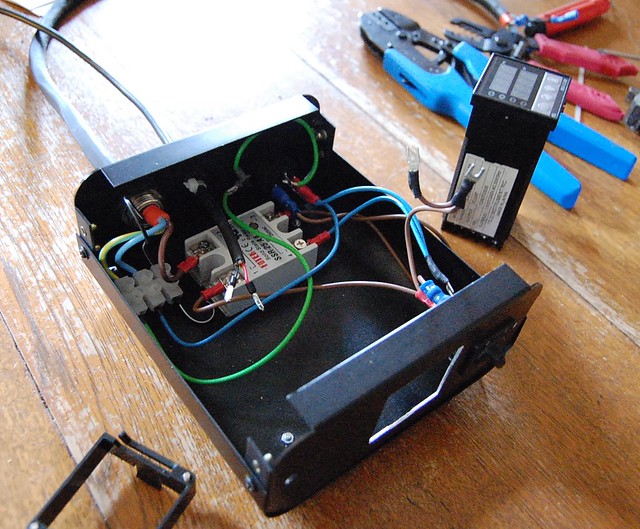
    The wiring to the heater element and distribution fan can't be placed outside the insulation for obvious reasons, so high temperature insulated wire must be used here. There are all sorts of types of wire used in commercial ovens etc but most of them are realtively difficult to obtain or expensive or both. The simplest solution is to use the silicone insulated wire sold for use in Radio controlled models, I bought 1 metre of each of three wires in 14 gauge for about $10.


    008 by Markwine, on Flickr

    The silicone insulated wires are the thick black, blue and red wires. The green earth wire is a piece of Noryl insulated wire (105 degree rating) from a reel I already had (I use it for star earthing in valve amplifiers).

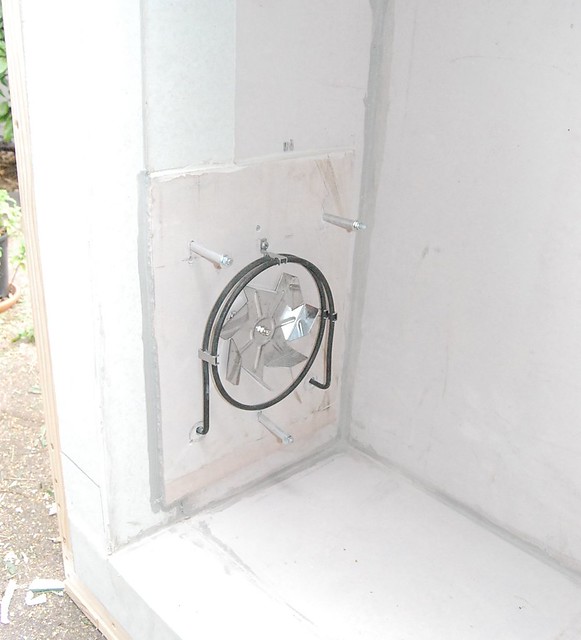
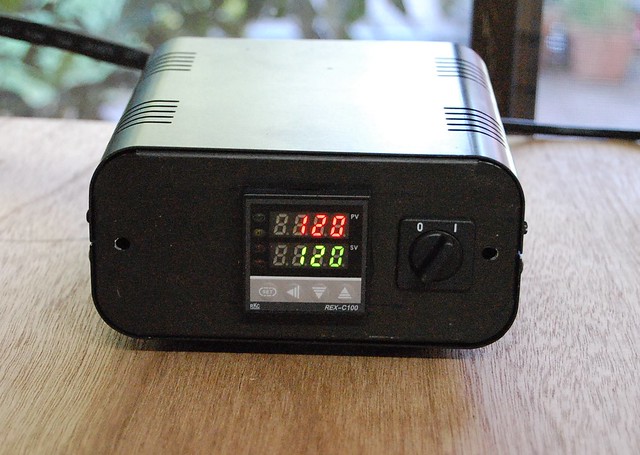
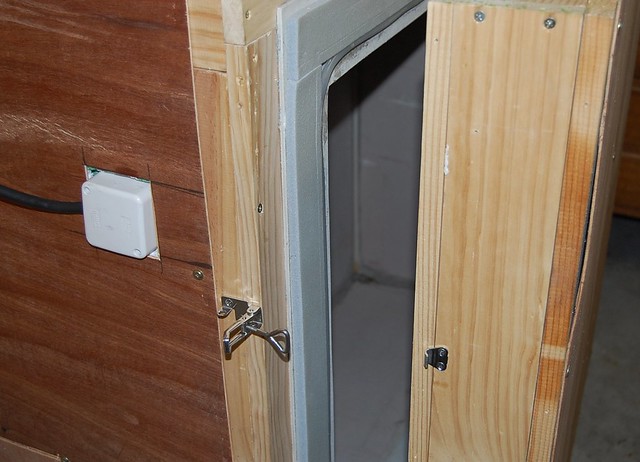
    You will notice that the fan motor has a second cooling blade on the motor side of the mounting plate which serves to cool the motor itself. This obviously won't work if the motor is inside a fully insulated chamber, so we have to accept some heat loss and build a small chamber around the motor assembly and allow it to vent to the outside.


    020 by Markwine, on Flickr

    Also note that there is no foilboard insulation in this section: aluminium foil is an excellent conductor of electricity, a fact that has killed a number of insulation contractors.


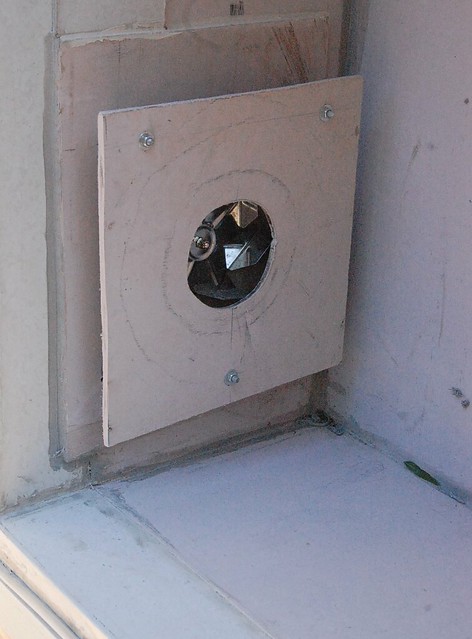
    030 by Markwine, on Flickr

    A small vented cover is used outpboard of the fan chamber

    To be continued.

  2. #2
    Join Date
    Aug 2011
    Location
    Beechworth, VIC
    Posts
    2,527
    Post Thanks / Like
    Mentioned
    9 Post(s)
    Tagged
    0 Thread(s)

    Default Re: DIY Curing Oven

    Addenda et apologia:

    I should have been clearer, the foilboard is inside the wooden frame and outside the rockwool insulation. That should be clear from the pics but the text is ambiguous, sorry.

  3. #3
    Join Date
    Feb 2009
    Location
    Noblesville, Indiana, United States
    Posts
    1,799
    Post Thanks / Like
    Mentioned
    0 Post(s)
    Tagged
    0 Thread(s)

    Default Re: DIY Curing Oven

    Maybe I missed it, but how hot and for how long?

  4. #4
    Join Date
    Aug 2011
    Location
    Beechworth, VIC
    Posts
    2,527
    Post Thanks / Like
    Mentioned
    9 Post(s)
    Tagged
    0 Thread(s)

    Default Re: DIY Curing Oven

    Quote Originally Posted by Craig Ryan View Post
    Maybe I missed it, but how hot and for how long?
    In part 2 (hopefully today).

  5. #5
    Join Date
    Aug 2011
    Location
    Beechworth, VIC
    Posts
    2,527
    Post Thanks / Like
    Mentioned
    9 Post(s)
    Tagged
    0 Thread(s)

    Default Re: DIY Curing Oven

    The heating element is from a domestic “fan forced” or “convection” oven, designed to be used with a distribution fan. I bought both the element and the fan from an online appliance spares supplier, about $40 for both. The element is a 240V 2.2 kW type as that keeps me within the 10A limit of the standard Australian domestic supply. I installed it on one side wall of the oven with all wiring outside:


    Fan and Heater, no cowl by Markwine, on Flickr

    The distribution fan is more efficient with a cowling over it and obviously safer, so I made a simple cowling from a piece of fibre cement sheet with a hole cut in it and mounted it on three standoffs (short lengths of M6 all thread inside shorter lengths of 10mm aluminium tube):


    Heater with Cowl by Markwine, on Flickr

    The backside with the wiring is visible in one of the pics from yesterday. I commoned the neutral supplies for the fan and heater but kept the live supplies separate so I can have the fan run continuously while the heater is controlled by the PID loop. Both fan and heater were earthed for safety, only one of the earth lines is visible in the pic.

    The PID controller I used is a cheap Chinese knockoff widely available on line, just search “Rex C100”. For reference, the instruction manual is available for download here.

    I bought a kit complete with reasonably accurate Type K thermocouple and a suitable SSR to increase the current capacity of the PID controller, all for about $30. Apparently some kits have quite inaccurate TCs so it might be worth buying the bits separately. If you do this, make sure your SSR is compatible with mains level control, some SSRs expect 12V or 24V DC inputs. The PID controller has a temperature offset function so if needed you can correct for the TC accuracy using iced water as a 0 C reference.

    I mounted the PID controller, SSR and an on / off switch in a small enclosure I had on hand:


    032 by Markwine, on Flickr

    It’s a bit of a squeeze once the controller is mounted:


    034 by Markwine, on Flickr

    I’m not going to detail the wiring here, it’s all in the manual. I used 15A rated mains wire for the heater to ensure it stays in rated temperature range in a warm operating environment. The thermocouple is mounted through the top of the oven and sits about 150mm below the top on the side away from the fan.


    Thermocouple by Markwine, on Flickr

    I didn’t bother changing the loop parameters on the PID controller, the default settings are working OK: The controller LEDs indicate that the PID is doing its thing as it approaches set point and the set point is held within 1 degree as indicated


    Success by Markwine, on Flickr

    Total time to heat from ambient (about 24 C today) to 120 was 20 minutes. The temperature ramp rate starts out at 5 C per minute but slows as it rises (due to losses) and is around 3 C per minute from 60 to 100 C.

    This is the free air ramp rate, the rate inside a vacuum bag should be a little lower but I haven’t yet measured this. 3 C per minute is the recommended ramp rate for many prepregs.

    With a PID loop it's a little hard to estimate the duty cycle but it seems to be around 60%, so the net power consumption will be around 1.5 kW.

  6. #6
    Join Date
    Jun 2008
    Location
    Sutton, MA USA
    Posts
    4,548
    Post Thanks / Like
    Mentioned
    1 Post(s)
    Tagged
    0 Thread(s)

    Default Re: DIY Curing Oven

    This is awesome. Thanks, Mark!
    Mike Zanconato
    Web
    | Instagram | Twitter | Facebook | Flickr | Tumblr

  7. #7
    Join Date
    Aug 2011
    Location
    Beechworth, VIC
    Posts
    2,527
    Post Thanks / Like
    Mentioned
    9 Post(s)
    Tagged
    0 Thread(s)

    Default Re: DIY Curing Oven

    Temp v Time.jpg

    Edit: time to 120 C was 30 minutes, not 20.

    I Should have included this graph. I took a series of photos of the controller as it heated up then used the time stamp of the camera to make the graph.

  8. #8
    Join Date
    Aug 2011
    Location
    Beechworth, VIC
    Posts
    2,527
    Post Thanks / Like
    Mentioned
    9 Post(s)
    Tagged
    0 Thread(s)

    Default Re: DIY Curing Oven

    Last part

    Door showing basic construction. Fibre cement sheet is the size of the oven chamber plus outer flanges.


    Door - structure by Markwine, on Flickr

    Rockwool


    Door - Rockwool by Markwine, on Flickr

    Two layers of foilboard, held in place with tape so as not to compress the rockwool. Remember it’s the air that does the insulating, the rockwool just stops the air moving about.


    Door - Foilboard by Markwine, on Flickr

    Third layer foilboard in two pieces with crossbrace between


    Door- 3rd Layer by Markwine, on Flickr

    And an outer skin


    Door - Outer by Markwine, on Flickr

    The door seal is also in two parts: the inner seal is a length of silicone tubing, the outer is the foam used for expansion gaps in concreting, rated for 105 C. A pair of stainless over centre clamps as used for sealing hatches on boats.


    Seal and latch by Markwine, on Flickr

    I also wanted the hinges adjustable for fit but couldn’t buy anything suitable so a made some up with two eyebolts and a chunk of UHMWPE.


    Hinge Detail by Markwine, on Flickr

    Unfortunately they are not stiff enough to hold the door up. Simple solution is a wheel on the door to take some of the weight.


    Door Wheel by Markwine, on Flickr

    Which brings me neatly to the subject of what I’ll do differently next time. Frankly, just about everything.

    The heater, fan and controller work very well so they can stay, but I’d probably buy a better quality PID like the Auber unit in my coffee machine (yes I’m one of those).

    Instead of building from the inside out I’d go from the outside in. Since I’m a terrible carpenter it took me far too long to build this, next time I will spend more on materials, specifically sandwich panel.

    coolroom.jpg

    50mm sandwich panel is around $25 – 30 per square metre, I’ll need about 4-5 square metres plus edges and fittings (which are more expensive than the panels themselves in this size) so figure about $300 all up. I’d build the outer skin then fix the inner supports and the rockwool then the inner chamber. Since 50mm sandwich panel is R 2.0 I'd need to go up a grade in rockwool to at least 2.5, preferably 3.0.

    An alternative is to build the whole thing in one layer using one of the fireproof sandwich panels systems which are rated to 1000C but as far as I am aware they are very expensive and only made to order.

  9. #9
    Join Date
    Aug 2014
    Location
    Kingston, Ontario, Canada
    Posts
    1,274
    Post Thanks / Like
    Mentioned
    0 Post(s)
    Tagged
    0 Thread(s)

    Default Re: DIY Curing Oven

    I subscribed to this thread and I hate for this to be my first post on VS rather than something with my own content and that this thread is nearly a year old.....but:

    how is this holding up?

    What r value of rockwool insulation were you using in addition to the foil panels?
    You mentioned that you would change from r2.5 to r3...are you feeling the exterior of the wood panels being warm after a few hours or is that just a preference to speed up the heating procedure?

    Im not entirely familiar with PID controls for this type of unit but you recommend going with a more expensive Auber PID. What advantage would this have over the cheaper ebay unit that you used? I have my inclinations but I will save those after I hear your opinion.

    Thanks,
    Matt

  10. #10
    Join Date
    Aug 2011
    Location
    Beechworth, VIC
    Posts
    2,527
    Post Thanks / Like
    Mentioned
    9 Post(s)
    Tagged
    0 Thread(s)

    Default Re: DIY Curing Oven

    To answer in order:

    It held up well until I made a new oven large enough to fit my jig inside. Apart from a few epoxy drips on the floor it looked and worked like new.

    In post #1, it says the rockwool used is R 2.0 (using ISO R values, not US values) but the value is buried in a calculation so you may have missed it.

    The comment re R 2.5 to 3.0 was in the context of using the prefab sandwich panel. There was one minor warm spot which was where the rockwool had shifted as I put the outer cladding on.

    The Auber unit is probably more accurate and will probably last longer. My cheap unit appears to read low by a couple of degrees but it's working fine so far - I just add a few degrees to the set point to compensate.

    The new oven is 1.4 (L) x 1.0 (H) x 0.5 (D) and better insulated as the inner cavity was made from compressed straw building panel, adding an extra R 0.5. Net heat loss is about the same so the element is fine but the fan is slightly too small for the larger space, I'm noticing some stratification in curing.

  11. #11
    Join Date
    Aug 2011
    Location
    Beechworth, VIC
    Posts
    2,527
    Post Thanks / Like
    Mentioned
    9 Post(s)
    Tagged
    0 Thread(s)

    Default Re: DIY Curing Oven

    New_001.jpg

    Pic of new oven with jig inside.

    Note controller and vacuum pump on top. The black thing above the jig is a silicone hose for vacuum bagging.

  12. #12
    Join Date
    Aug 2014
    Location
    Kingston, Ontario, Canada
    Posts
    1,274
    Post Thanks / Like
    Mentioned
    0 Post(s)
    Tagged
    0 Thread(s)

    Default Re: DIY Curing Oven

    Thanks for the follow up!

    I was planning to build this sized oven basically for a one off 7005 aluminum tandem frame for the wife and I.... Is it safe to set the frame in the oven without the jig, assuming that you dont massively overshoot your goal temperature? An oven for a tandem would be massive if the (also one off) tandem jig has to go in.

  13. #13
    Join Date
    Mar 2009
    Location
    worlds biggest island
    Posts
    1,926
    Post Thanks / Like
    Mentioned
    0 Post(s)
    Tagged
    0 Thread(s)

    Default Re: DIY Curing Oven

    At 7005 heat treatment temperatures you will have no trouble with distortion.
    Bill Fernance
    Bicycle Shop Owner
    Part Time Framebuilder
    Bicycle Tragic

  14. #14
    Join Date
    Aug 2014
    Location
    Kingston, Ontario, Canada
    Posts
    1,274
    Post Thanks / Like
    Mentioned
    0 Post(s)
    Tagged
    0 Thread(s)

    Default Re: DIY Curing Oven

    Quote Originally Posted by progetto View Post
    At 7005 heat treatment temperatures you will have no trouble with distortion.
    That was my understanding as well. I just wanted to have a confirmation with one of the resources that i found.

  15. #15
    Join Date
    Nov 2009
    Location
    Brisbane, Qld. Australia
    Posts
    2,268
    Post Thanks / Like
    Mentioned
    0 Post(s)
    Tagged
    0 Thread(s)

    Default Re: DIY Curing Oven

    What is the 7005 heat treat temp? Time?
    __________________________________________

    "Even my farts smell like steel!" - Diel

    "Make something with your hands. Not with your money." - Dario

    Sean Doyle

    www.devlincc.com

    https://www.instagram.com/devlincustomcycles/

    https://www.flickr.com/photos/139142779@N05/

  16. #16
    Join Date
    Mar 2009
    Location
    worlds biggest island
    Posts
    1,926
    Post Thanks / Like
    Mentioned
    0 Post(s)
    Tagged
    0 Thread(s)

    Default Re: DIY Curing Oven

    6 hrs @ 120*c + 4 hrs @ 100*c or variation there of depending on manufacture.

    Quote Originally Posted by devlin View Post
    What is the 7005 heat treat temp? Time?
    Bill Fernance
    Bicycle Shop Owner
    Part Time Framebuilder
    Bicycle Tragic

  17. #17
    Join Date
    Aug 2014
    Location
    Kingston, Ontario, Canada
    Posts
    1,274
    Post Thanks / Like
    Mentioned
    0 Post(s)
    Tagged
    0 Thread(s)

    Default Re: DIY Curing Oven

    do you go straight from 120c to 100c or do you let the frame naturally cool in between cycles?

  18. #18
    Join Date
    Mar 2009
    Location
    worlds biggest island
    Posts
    1,926
    Post Thanks / Like
    Mentioned
    0 Post(s)
    Tagged
    0 Thread(s)

    Default Re: DIY Curing Oven

    You just ramp down from 120 and continue the heat
    Bill Fernance
    Bicycle Shop Owner
    Part Time Framebuilder
    Bicycle Tragic

  19. #19
    Join Date
    Aug 2014
    Location
    Kingston, Ontario, Canada
    Posts
    1,274
    Post Thanks / Like
    Mentioned
    0 Post(s)
    Tagged
    0 Thread(s)

    Default Re: DIY Curing Oven

    Thanks for the information. Thats another thing I was going to ask my tube supplier when I order....

    Aluminum frames will be new for me.

  20. #20
    Join Date
    Nov 2009
    Location
    Brisbane, Qld. Australia
    Posts
    2,268
    Post Thanks / Like
    Mentioned
    0 Post(s)
    Tagged
    0 Thread(s)

    Default Re: DIY Curing Oven

    What actually happens at those temperatures? Does it just accelrate the aging process?

    (I am going to google this as well)
    __________________________________________

    "Even my farts smell like steel!" - Diel

    "Make something with your hands. Not with your money." - Dario

    Sean Doyle

    www.devlincc.com

    https://www.instagram.com/devlincustomcycles/

    https://www.flickr.com/photos/139142779@N05/

Page 1 of 2 12 LastLast

Similar Threads

  1. Easy Bake Oven
    By surlypud in forum The Frame Forum@VSalon
    Replies: 6
    Last Post: 06-25-2013, 09:36 AM
  2. Powder coating oven
    By edelbikes in forum The Frame Forum@VSalon
    Replies: 8
    Last Post: 11-16-2010, 09:51 PM
  3. Powder coating oven
    By suicideking in forum VSalon HandMade Gallery (non-cycling)
    Replies: 6
    Last Post: 10-11-2010, 07:38 AM

Bookmarks

Bookmarks

Posting Permissions

  • You may not post new threads
  • You may not post replies
  • You may not post attachments
  • You may not edit your posts
  •