
 Likes:
 19 hours in at this point...maybe twenty?
10% scratching my head,
10% scratching my ass,
50% measuring,
5% re-measuring,
10% cutting,
10% filing,
5% taking pictures...
043-001.jpg

 In the drops


19 hours in at this point...maybe twenty?
10% scratching my head,
10% scratching my ass,
50% measuring,
5% re-measuring,
10% cutting,
10% filing,
5% taking pictures...
043-001.jpg
So this is how the world works, all energy flows according to the whims of the great magnet." - HST
Slide to the back


Looks great Luke. Are the tubes at rest as in the photo above? i.e., if the unit was laid horizontal and the clamps loosened, would any of the angles be pushing or pulling on others? I would pre-drill the lugs for pins, makes it easier. I know you were probably planning that, but wasn't sure.
No Chain
Paceline
Looks awesome man! Keep going.
The only thing more fun than building it is gonna be riding it.
Will Outlaw, Amateur
Build it. Ride the hell out of it.
In the drops
The tubes slide thru all of the holders quite easily...like a hand grasping a handrail. I drilled and honed until I was satisfied with the 'easy entry'.Originally Posted by Craig Ryan

My angles are good, nothing was forced into place. I could open up the holders and lift the frame out without any issues.
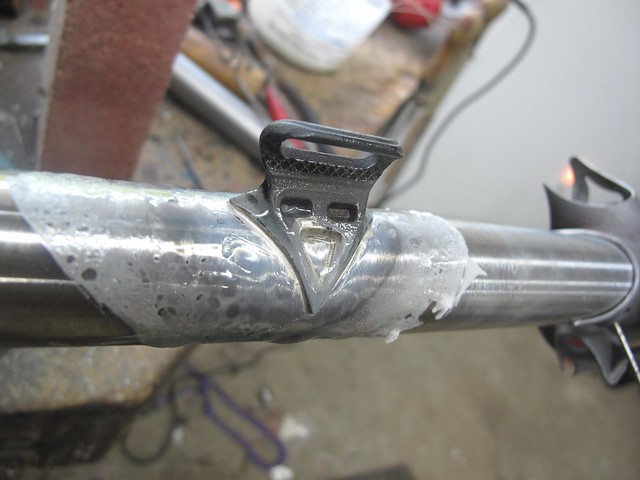
I wanted to mock everything up...get everything nice and snug,
then mark out all of my positions for cage holes,cable garbage, and derailleur tab.
Then I will disassemble everything and work on all of the individual tubes and their required special treatment.
While apart, I will drill the lug pin holes...and be ready for final assembly when the tubes are finished.
(Not sure if that is the most practical way to do it...maybe you guys have suggestions??)
Thanks for all the help!
So this is how the world works, all energy flows according to the whims of the great magnet." - HST
In the drops
Thanks Pi...
Wish I had more time.
;)
So this is how the world works, all energy flows according to the whims of the great magnet." - HST
In the drops
That will insure an ear-to-ear grin...
So this is how the world works, all energy flows according to the whims of the great magnet." - HST
In the drops
Question time:
On the derailleur braze-on tab...I've decided that about 145mm up the ST from the BB center is a good centering point for the Derailleur attachment bolt.
(Will be running a 53/39 up front.)
Is there an industry standard position?? Maybe a better position to cover the use of a compact crankset also??
(I didnt have anything in the shop today to measure a 50T)
Water bottle cages....64mm center to center, but is there a standard number up the DT that you guys typically use?
Housing tunnel
::::::::::::-------------------------------------:::::::::::::::
(As it turns out...is nearly actual size to that type)
Jeeez...those parts are small.
I want to thank Eric Estlund for directing me where to buy these aforementioned parts !!! $10.70 worth of tiny shit from Nova.
I've been warned not to try to do the bare-wire housing tunnel idea on my first frame, and after seeing the parts...
I get why.
Brass to steel...okay, I guess with silver 56%. BUT THAT SHIT IS TINY AND THIN!!
I'm cool with angling the holes to burry the ferrules...but attaching the 4mm brass tube to the ferrule without a shoulder or anything seems sketchy,
and may fall outside of my ability.
The redneck heritage in me tempts me to puss-out and grab JB WELD to attach the brass tube to the ferrulle ends
Any suggestions?
Thanks- (in advance)
Luke
So this is how the world works, all energy flows according to the whims of the great magnet." - HST
OTF
Luke, if you precisely position the front derailleur braze on piece with a specific front derailleur than there is no industry standard. Their measurements vary depending on the manufacturer and model. I like the top of the derailleur to be flush at the top of the braze on. Because both of these can differ, I always custom place the distance of the boss to exactly match both pieces. For example where the top of the front derailleur sits on a Dura Ace 7800 is 4mm different than a 7900 (I'm going by memory so I'm not positive of these numbers without checking). Sometimes this means putting in the bottom bracket and crank and then positioning the front derailleur (already attached to the boss) so the outer cage is just a mm above the big ring when it is directly over it. Then you mark the position of the boss. While you are at it you want to make sure the rotation of the braze on allows the derailleur to swing left and right over the ring in equal amounts too. For measuring convenience, I use as a base measurement the top of the bb shell. It is much easier to put a real ruler right against that than trying to find the imaginary point in space that is the center of the bb shell.
The difference in radius between a 53 and 50 chainring is about 6mm.
I use 65 mm between the 2 water bottle braze ons. Drill bits can wander so you want to drill your holes carefully. I like to use a #3 center drill. If you are using conventional bits, you want the ones with 135 degree points because are they are better for drilling thin wall tubing than the more common 118 degree ones. In fact once you get both your centerline and cross marks for where to drill your holes, you should use several size bits to sneak up on your final diameter (which can be either 1/4" or 6mm). Measure your boss to see what size it is. The reason to use several size bits is because your bits will tend to wander away from where you want it to go and you can bring it back to center with either side pressure with the next drill size up or filing it a bit before using the next bigger drill size. If you did drill your hole off center, you can file a bigger hole to get the boss to center. The lip of the boss will cover your mistake.
I use 175mm as the distance off of the top of the shell (because it is something to measure against and not a point in space) to the center of the first hole. The reason for this distance is that it is about the lowest 2 sets of water bottle cages (one on the DT and the other on the ST) can fit without getting in the way of each other. For certain frames they can be slightly lower.
I use several tools to assist me in getting my marking in the right place on the tube. For the cross mark representing the distance to and between the holes I use a slip tube with a squared end and then split in half. This tool is also very useful when making sure lever bosses or cable stops are directly across from each other. There are many ways to find the tube centerline.
90% of my framebuilding class students would have too much trouble successfully brazing in through-the-top-tube brake cable stops. i encourage all but the most exceptional not to get in over their heads by trying something likely beyond their abilities. Keep in mind this part of the build is at the end of a 3 week course where they have read descriptions of how to braze, had many demonstrations of how it should be done and then been watched over like hawks by instructors giving immediate feedback during every one of their prior brazing attempts. Now more than 10% would still be successful if they tried but neither do most want to take even a 50/50 chance of failing. I've had a couple that have actually done it well. Of course if you are doing it the Sachs way first, you will have accumulated only limited brazing time when attempting this so my advice is to wait to try putting in through the top tube cable guides until after you have more experience. Of course if you don't care if you screw it up and don't mind doing it over again with fresh parts and want to know if you belong in the top 10% give it a go. It will be entertaining and/or educational for us observers. As an alternative, I would recommend two brake cable stops off center on the top tube. Paragon makes some beauties. My favorites are CS1007.
In the drops
Wow Doug...thanks for the info.
Placing the BB and the crankset in the frame would be a sure-fire way to get it right.
The only issue is:
I'm not certain of the group I'm using. I may go SRAM red, maybe Campy record. However,I can get a killer deal on the Shimano stuff thru some special discounts.
I may have to bring a few examples home and lay them in there...but we only have excess Shimano stuff.
I'll work that out, and produce a number. Maybe someone at SRAM can get me numbers on a tech line today?
Drilling round shit can be a pain...I will for sure start small with the bits and graduate upwards to the final size.
Using a press will help some.
Of course I want to be in the top 10% Doug. I'll propably give it a shot. It's only a top tube.
The pics may be more entertaining, than educational.
Someday...perhaps, I will sign up for your course and learn a bit more about this craft.
LUKE
So this is how the world works, all energy flows according to the whims of the great magnet." - HST
Administrator

Keep it simple and fixture-less.
The seat tube is mitered and pinned so its rotation is already impossible.
Measure up 121mm from the bb shelf and drill a hole o the RH center line.
The rest is all you atmo...
In the drops
<<<Starts saving pennies for an R-atmo-S apprenticeship.
So easy a caveman could do it!
THANK YOU MR SACHS.
So this is how the world works, all energy flows according to the whims of the great magnet." - HST
OTF
One easy way to tell if you are ready for a more advanced braze is if you can do it without having to think about how you are moving your hands when you are doing it. You are still on the steep part of the learning curve if, for example, you have to remind yourself to keep your flame 2 or 3 inches from the joint. When you don't have to think about what speed, angle and distance to move your flame and at the same time can keep the silver right at its entry point as it melts you are ready. That process includes being able to flick the flame on and off as another means to control the heat.
Most beginners struggle to move both hands independently of each other during a braze. One typically freezes when they are thinking about how to move or position the other. When all the required motions are in muscle memory is when you can do the advanced stuff. A tube-through-the-top-tube braze requires almost instant reactions in order to not fry a spot. There is much more time to analyze and correct when doing something heavier like a fork crown to steerer braze. That's why that joint is a good place to start.
Let me give you an example of a typical rookie mistake. You've finally got your flame pattern right and just as the pieces come up to temperature, you place the silver in position. Commonly a beginner doesn't think to have the silver right there holding it at the best angle so they take too much time to position it and the joint starts to overheat.
So do a little test, drill and file a 1.5" long oblong hole in a .035" wall thickness 4130 practice tube. The hole should fit a 1/4" tube with a wall thickness of .028" (give or take on all of the dimensions for everything). Slide a small length of that little tube into the hole and try brazing it up. That will tell you if you are ready or need more practice.
In the drops
So this is how the world works, all energy flows according to the whims of the great magnet." - HST
In the drops
Dinged my DT tonight.
Only a slight mark, will cover with no problem. Sad.
Thought I had all of my bolts loose, and got in a hurry...pulled to wiggle. POW.
3mm x 1mm tiny mark.
Shake it off.
;)
So this is how the world works, all energy flows according to the whims of the great magnet." - HST
In the drops
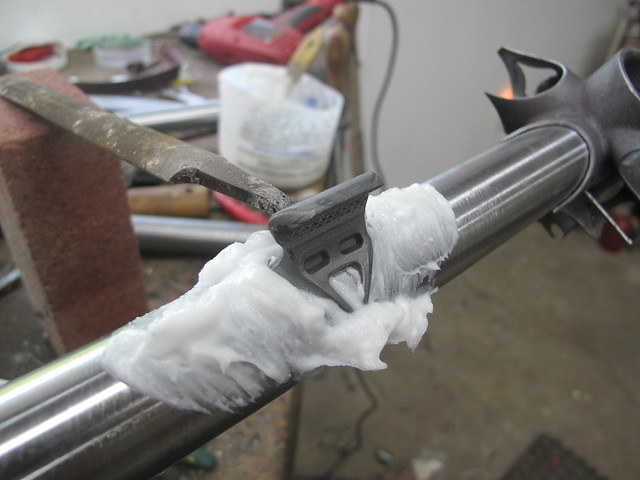
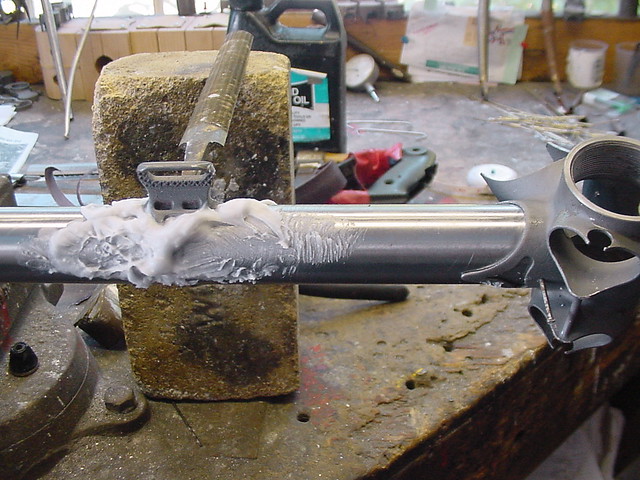
I worked on my cable tunnel...
003-002.jpg
Tiny parts.
I needed to find a way to hold the ferrule onto the tube, I thought flaring would be a simple solution...
006-002.jpg
I put just a slight flare on the end, just to hold it from coming off the end. Now only a small tack on the backside will hold it.
(I'll put the other end on pre-flare when I have the correct length)
007-003.jpg
005-003.jpg
So this is how the world works, all energy flows according to the whims of the great magnet." - HST
In the drops
Practice tunnel opening...
015-003.jpg
So this is how the world works, all energy flows according to the whims of the great magnet." - HST
In the drops
I worked to improve my tunnel design.
I really have my doubts of (me) attching brass to steel via silver. I see a mess coming.
Mechanical connection seems a likely answer for me.
I started with a fresh end...threaded the outside of the brass tunnel, ran a nut in, inserted the ferrule, and then flared the tubing.
Now I have a locking mechanism that attaches the two pieces.
I'll get an OA length and do the same.
(The second end will be more of a challenge, having to do it all internal, then tightening the nut.)
I plan to build a tiny crows foot wrench to tighten the nut up inside the tube.
I'm sure this all seems like bullshit to go through...and a laugh to the real builders out there.
It's what I have right now. That's all.
001 (6).jpg
So this is how the world works, all energy flows according to the whims of the great magnet." - HST
In the drops
NOW...JUST TO SHOW THAT THIS IS A REAL LIVE REALITY SHOW>>>
I have to share my F*ck-Up.
I layed out the distances on the TT for the entrance and exit of my tunnel.
I marked them on the centerline across the top, and transfered them to the LH side.
I did this front and back...
and drilled...
004 (4).jpg
and filed...
006 (3).jpg
and shaped it nicely for the ferrule to shoot right out...
007 (2).jpg
BUTTTTTTTTTTTTTTTTTTTTT !!!
If you look closely at the top pic, and notice the tube end. (this is the rear, or exit)
I did not drill it on the LH side (which the layout marks are hidden from this view),
but the top of the TT!
So this is what ya get when your not paying close attention to your layouts...
010 (2).jpg011 (3).jpg
A rookie mistake, for sure. (should hve used a TWIZZLER)
I know a cable exit is never good pointing upward like that...water and shit would be down in there.
The front is correct...in the side.
I thought of scrapping the whole tube. Then I thought different.
If this shit is as hard to braze in as some say...then I need practice doing it. REAL practice.
If I pull it off, then I'll see how it ends up. Maybe it's not a big deal coming out the top.
****Most likely...I'll cook the f*ck out of it anyway, and scrap the entire tube and the internal tunnels.
A) It's my first frame.
B) I make mistakes.
C) I can call it all practice, and smile...and learn.
Now that I got that off my chest, I don't feel so much like running my d*ck thru a chainring.
Luke
So this is how the world works, all energy flows according to the whims of the great magnet." - HST
OTF
Luke, you've chosen to do a through the top tube brake cable method that requires advanced brazing skill. Besides the challenge of brazing the steel ends onto the brass tubes, you will have equal or more difficulty in brazing the unit into the top tube. The only difference is that there is more pressure to get that right since it is a lot more trouble to start over again. If you aren't good enough to braze the brass and steel together you won't have the skill to braze that unit into the top tube either. So pass some practice brazing tests first to see if you can do it before you make a mess of the real thing.
One easy method to practice brazing steel to brass is to drill a 1/16" hole in a scrap tube. Place a short piece of a brass brazing rod in the hole. Silver braze it in with enough heat control so that the brass won't heat up so much as to start bending over and there is a nice little silver ring at the base. This is also a great way to seal vent holes in fork blades or seat stays. Don't forget you can always choose instead to put on those nice brake cable stops from Paragon. :)
Posting Permissions

 Reply With Quote
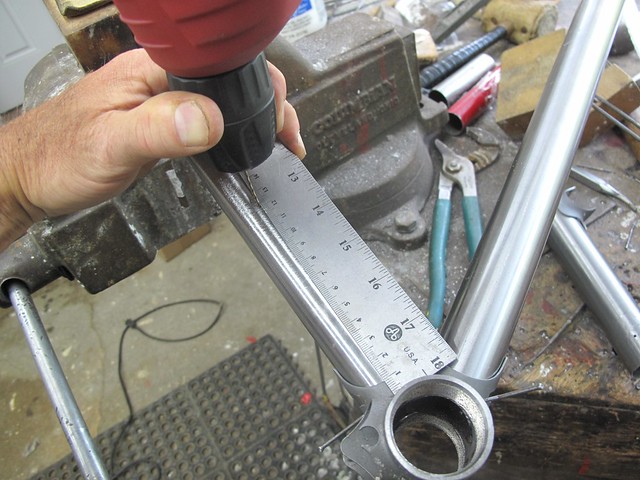
Bookmarks