User Tag List

Page 1 of 4 1234 LastLast
Results 1 to 20 of 70

Thread: the tell all NO HOLDS BARRED alignment thread atmo -

  1. #1
    Join Date
    Jun 2008
    Location
    Sutton, MA USA
    Posts
    4,548
    Post Thanks / Like
    Mentioned
    1 Post(s)
    Tagged
    0 Thread(s)

    Default the tell all NO HOLDS BARRED alignment thread atmo -

    Hi Tristan,
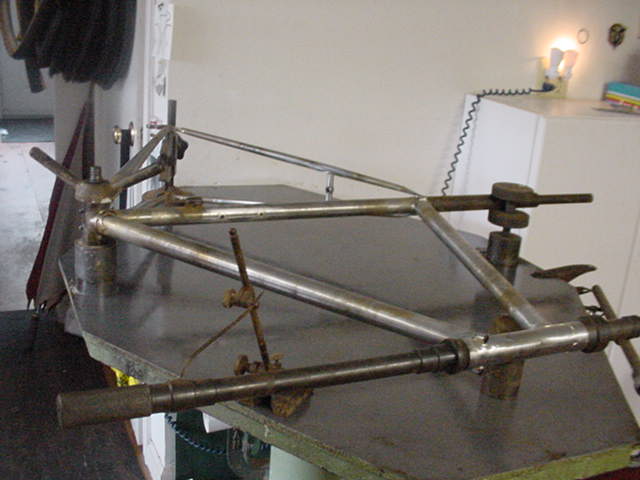
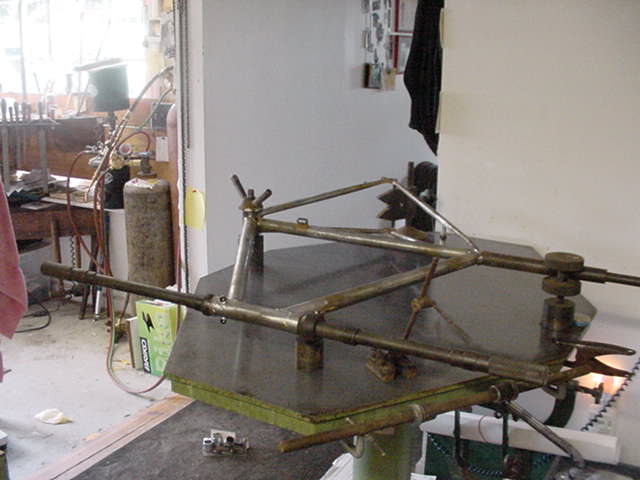
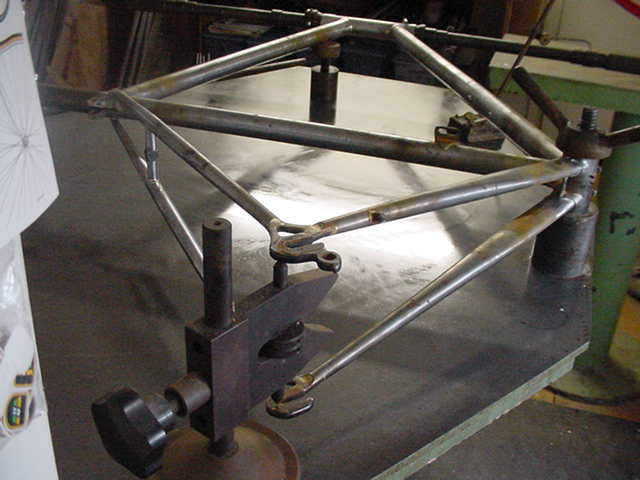
    Good questions! I'll tackle the DT question first. Ultimately, I want the center of the head tube, the center of the seat tube, and the center of the distance between the dropouts to be in equal plane above the plate. Measuring the DT deflection gives me a quick visual of how the front triangle is shaping up, but I ultimately check the HT centerline using the cones and rod.

    The ODs of the tubes are generally pretty consistent along any given tube's length. While a dummy seatpost may be a better theoretical way to check the seat tube, it does present some practical challenges. I, for one, would need a much larger plate for these bigger bikes. You would not want to measure only along an 8 or 10 cm test bar. Measuring along a long tube magnifies the error. But then you run into the problem of having a long test bar hanging off the end of the tube, leading to deflection of the tube. Yes, you could have a stand-off under the tube, but that just becomes a fulcrum point in my mind. I've found using the tubes themselves to be precise and accurate way to check, and is an accepted practice in the trade.

    Alignment itself is something that few people will openly discuss, probably because there isn't really any way to test how it influences a bike and the way it handles. And since there aren't any real data and correlations, I think it gets swept under the rug. It's this voodoo type of thing. I think many of us who have tables have measured production frames that were miles away from what the handmade bike world strives for, yet those owners don't complain about pull or shimmy. Maybe they don't know better. I don't know. Maybe we could build some frames that are an eighth inch out and build it up and see. Who has time for that though? But its my belief that most handmade bike builders are working well within an order of magnitude (or two maybe? who knows?) of what could be felt by the rider. That's not to say there aren't handmade bikes out there that don't pull or shimmy or act wonky (technical term), but can we simply isolate that wonkiness to the frame and/or fork? There are lots of other parts hanging off the frame that could influence that.

    Anyway, I think it's a good topic for discussion. Maybe I'll start a thread. That way, we can all agree to disagree.
    Mike Zanconato
    Web
    | Instagram | Twitter | Facebook | Flickr | Tumblr

  2. #2
    Join Date
    Jul 2008
    Location
    Down under
    Posts
    1,562
    Post Thanks / Like
    Mentioned
    0 Post(s)
    Tagged
    0 Thread(s)

    Default Re: Friday PicFest No.111 Comments

    Snipped
    Quote Originally Posted by zank View Post

    Alignment itself is something that few people will openly discuss, probably because there isn't really any way to test how it influences a bike and the way it handles. And since there aren't any real data and correlations, I think it gets swept under the rug. It's this voodoo type of thing.
    Anyway, I think it's a good topic for discussion. Maybe I'll start a thread. That way, we can all agree to disagree.

    Yes
    I will chat about alignments any day when time permits here
    and I will speak about my tolerances with out voodoo or spin yarns
    and speak about what I really have found or noticed is practical since 1979.
    I like this subject
    and most builders hide from this subject
    Cheers Dazza
    The rock star is dying. And it's a small tragedy. Rock stars have blogs now. I have no use for that kind of rock star.
    Nick Cave

    www.llewellynbikes.com
    The usual Facebook page
    https://www.flickr.com/photos/llewellyncustombicycles/
    Darrell Llewellyn McCulloch

  3. #3
    Join Date
    May 2008
    Location
    Better to be ruined than to be silent atmo.
    Posts
    22,142
    Post Thanks / Like
    Mentioned
    24 Post(s)
    Tagged
    0 Thread(s)

    Default Re: the tell all NO HOLDS BARRED alignment thread atmo -

    well i cannot find the archived post that addresses this so i'll reiterate here. see the images below - they are from my old shop and maybe 6-7 years ago. every point gets measured: the seat tube over its length, the linearity of steering axis, the steering axis opposing the bio-mechanical axis, the rear hub's placement, and the way a wheel sits in the frame. the ideal is for every point to be where it should. my ideal is that an as-is brazed frame, after machining, should be too. but my reality is that i will allow a single measured point to deviate up to a mm, OR i will allow all deviations to add up to a mm. i am not a cold setting proponent, so if the points cool into a place that yields what i want, it stays there. the exception is dropouts. if the rear wheel is visibly over by a mm after i assemble the rear triangle, i file up the longer (seat stay) side so that it is dead center atmo. caveat - my frames will look different on your table. my frames will look different on my table if i invert them. and, if anyone ever takes a facing tool to one of my frames once it passes my table's smell test, he has essentially altered all the dimensions i measure, and all bets are off.


  4. #4
    Join Date
    Jul 2008
    Location
    Down under
    Posts
    1,562
    Post Thanks / Like
    Mentioned
    0 Post(s)
    Tagged
    0 Thread(s)

    Default Re: the tell all NO HOLDS BARRED alignment thread atmo -

    Richard is one of few builders who speaks on this subject
    Bravo
    As a lad, teenager, as the years pass , as I worked in isolation down here and when the opportunities came when I could speak to older builders I found it frustrating that few will speak, or admit to their tolerances
    as I wanted to understand what was acceptable and what worked etc
    and many times many speak of tolerances but are not actually putting a number to it
    I suspected many did not have much understanding, they just made frames, close enough and they worked fine.
    so all is cool
    but they felt very uncomfortable about speaking on this subject.
    Frames have to be pretty badly aligned for any one to really notice when riding, which is how many Carbon frames seem OK and get by. The alignments of the majority carbon forks and frames is terrible, it will shock you if you measure some on a good inspection plate, but 2 to 4mm is now acceptable along with lousy dropout alignment, tighten the Q/R and the fork twists or the RD waves at you and bending stress on the axle etc
    contrary to the makers claims.
    Head set fit is also important, fork alignment and good wheel dish.
    It all adds up to a sweeter riding bike
    but over the years I strive to find what is practical in the workshop's daily out put.
    Some things need to be aligned to .10 or .20mm some things can be .5mm, it all depends on which alignment path we speaking about. I need to prepare a document on my workshop practice some time soon.
    For me the most important tool is the workshop is the inspection plate. (certification is another whole subject)
    One has to have some thing to have faith in (and that alone is a big subject)
    jigs and fixtures are not inspection tools
    for accuracy and or precision

    I have to unload stuff downstairs, feed the chooks and prep a frame, yeah on a Sunday but I got 4 hours in over the hills this morning
    more later
    Last edited by Dazza; 04-30-2011 at 09:18 PM.
    Cheers Dazza
    The rock star is dying. And it's a small tragedy. Rock stars have blogs now. I have no use for that kind of rock star.
    Nick Cave

    www.llewellynbikes.com
    The usual Facebook page
    https://www.flickr.com/photos/llewellyncustombicycles/
    Darrell Llewellyn McCulloch

  5. #5
    Join Date
    Jun 2008
    Location
    Philadelphia,PA
    Posts
    1,505
    Post Thanks / Like
    Mentioned
    1 Post(s)
    Tagged
    0 Thread(s)

    Default Re: the tell all NO HOLDS BARRED alignment thread atmo -

    I, as Richard has mentioned am not a user of the cold set. I will move the rear end before a bridge is installed to get it centered but not much and also not without first trying to move it with a sequence during construction. I pull a complete bike out of the fixture and do not build in sub-assemblies. I feel if the BB is going to be one of the contact points for the fixture I want it to be clean, fresh and square. I kind of dis-agree with Dazza on this one aspect. My fixture has to be a go/no go gauge and when I am loading a complete bikes worth of parts if one does not fit up right I need to know the fixture is good and telling me there was an error in the machining process. When I pull a bike from the fixture it goes to my surface plate and I use the head tube to support the frame. I check the seat tube twist, axle center, BB face for runout and last is the drop out faces. About 90% of the frames come out of the fixture within .005" but that is not realistic as the heat of welding or brazing will change everything. My goal is to keep it within .025" of twist and get the rear as centered as possible.

    I use a plunger back dial indicator to get most of my readings and my datum (the surface plate) is cast iron, 8" thick (with webbing) and was re-ground before I brought it in the shop. I trust it is .001" accurate and it will remain so for the rest of its life since I oil it and do not use it for anything other than inspecting stuff and the rare pulling of a rear end. I have a granite table but it is used for tool making and other precision work.

    To me the most important part of making a bicycle is the chainstay length. That is one thing that can really screw up a bike. That and knowing how to use an edge finder if you are using machine tools.

    Thanks for reading,
    Drew
    Last edited by EnginCycles; 04-30-2011 at 10:56 PM. Reason: spelling
    Drew Guldalian
    Engin Cycles
    www.engincycles.com

  6. #6
    Join Date
    Jun 2008
    Location
    Bozeman MT
    Posts
    1,773
    Post Thanks / Like
    Mentioned
    0 Post(s)
    Tagged
    0 Thread(s)

    Default Re: the tell all NO HOLDS BARRED alignment thread atmo -

    For me proper final alignment starts before frame construction has started by inspecting the tubes for runout. This is especially true for the seat tube and seat stays. If the seat tube isn’t straight and you align the frame with the top and bottom of the tube equidistant from the plate you don’t know what direction the seat post will be heading as it exits the frame. So if there’s runout to the side the seat post will actually locate the seat off the centerline of the frame and in reality it’s the thing we most need to be centered over the tires contact patch with the floor. If the seat is not directly above the contact patches then the bike will be leaning to one side when going straight and will then tend to pull to one side.

    I also very closely inspect the seat stays for runout. If the s-stays have runout they will not be equidistant from the bike’s centerline. This is important because we most often grind the dropouts so that the wheel is centered between those s-stays and while we end up with a bike that looks straight we are in fact just centering a wheel between seat stays that aren’t themselves centered.

    So once the tubes are inspected and the frame is fabricated the alignment can be performed. I start by facing the BB shell as all alignment will be based on these faces. I chase the threads and then cut the faces. To check my work I measure the width of the shell in 4 places around the shell. If the width varies by more than .001” then the facing needs to be redone. This frankly is very rare. I then ream/face the head tube and set the rear dropout faces parallel to one another. Then the frame can go onto the plate.

    With the faced BB on the post and the post locked down I can then reference the business parts of the frame to the plate. The first thing I check is the seat tube elevation (which is of course a lateral check but since the bike is horizontal….you get the idea). I want the top of the seat tube to be at the same elevation as the bottom of the tube – and if the tube has no runout then we know that the saddle will end up on the bikes centerline. Like most folks I also make sure that the head tube is level (no twist) with a rod and cones as well as making sure it’s centerline is on the centerline of the BB shell.

    Then it’s on to the rear dropouts. These of course need to be at the proper spacing and be equidistant from the frame’s centerline. My next step may not be the norm for some builders – I next check that the area of the seat stays that is adjacent to the wheel rim are equidistant from the bike’s centerline. If the tubes started out straight and both ends were properly located then the inside surface of each stay will be equidistant from the centerline of the frame (but heat distortion from brazing in the brake bridge can cause issues). In my mind this is one of the more crucial steps in the final alignment. If this isn’t done and they are not centered then when the wheel is installed and the dropouts ground to make the wheel look centered between the stays it will not end up on the centerline of the frame – but instead it will be leaning off to one side or another. So with the location of the stays relative the bike’s centerline confirmed I can be sure that the wheel will end up centered on the centerline of the frame.
    At this point the frame comes off the plate and the test wheel is installed into the frame. I check that the rim is centered between the chain and seat stays and if need be grind a very small amount out of the slot (using a dynafile) followed by rechecking – lather, rinse, repeat. I want to end up with the rim being no more than .010” (1/4 mm) closer to one stay than the other. Once done I will then use H tools to make sure that the dropout faces are parallel and concentric to one another and then the wheel goes back in and is rechecked to the stays.

    Lastly, with the wheel in place, I put the frame back on the plate and lock it down. I then check that the rim is level to the plate. This is a very tough final check of the alignment and can lead to fists full of your own hair when you first try it. If the rim is at the right elevation where is passes through the chain and seat stays it will be vertical and will place the tire’s contact patch directly below the saddle………….and it will be pointed straight ahead.

    A few random points –

    • The final check of the frame on the plate with the wheel in place is very important to me to make sure that where the rim passes through the chainstays that it is on the centerline of the frame or else the wheel will not be pointed straight ahead. If the wheel isn’t pointed straight ahead then the bike will crab the entire time and the rear wheel will not roll over the same spot the front wheel did when going in a straight line. Note that I did not check the c-stays fro runout like I did the s-stays. Call me lazy but I don’t do it. The reason being is that the BB end of the stays is controlled by the lugged BB shell (on a lugged bike) or by my skill in getting them exactly right on a fillet bike. I’m pretty good but thing can be off just a hair and make it so the chainstays are not in fact equidistant from the bike’s centerline. If I then just make the wheel look centered between those tubes the bike will only look straight and not really be straight. Combine this with the fact that many c-stays will get a tire and/or c-ring clearance dent and it becomes hard to tell where the wheel really is and if it is indeed pointed straight ahead. So by checking the wheel in the frame on the plate I can be assured that all is right.
    • Coldsetting – I don’t like cold setting but the simple fact of the matter is that you either do it or you have a frame that isn’t dead on straight. I cold set only a very small amount (elevation changes of 1mm or less). One can either just leave it a bit off or cold set it. I opt for the cold setting. If it is kept to very small corrections then the amount of stress built into the frame is very small and inconsequential. Maybe the frame will only last 50 years instead of 60 years but you’ll have 50 years of use with a straight frame. Like everything it’s a compromise.
    • Tolerances – I use a height gauge to check elevations from the plate and I use it as a go-nogo gauge and I do not measure an absolute number. For many years I did use a digital gauge and chased it down to .002” or so and you can spend the rest of your natural born life doing so and be little better for it. I then found that if I checked the frame with a set go-nogo gauge I could make sure that the arm of the gauge just brushes the tube and I’m within .005” at the absolute worst – and it’s fast.
    • I reference to the outsides of tubes most of the time with the big exception being the head tube which uses cones and a rod. I know some will say that I should reference to the tube’s centerline and I understand why – but if my tubes are so out of round that this leads to a false reading on my alignment than I have much bigger issues. I make sure the tubes are straight and round before they go into the bike and then trust the outside surface of the tube.
    • If your plate’s BB post if truly perpendicular to the plate, the plate is flat, the BB faces are parallel and the bike truly on the centerline you will be able to take the bike on and off the plate and get the same results each and every time. If all the above is done you will also be able to take the bike off and flip it and get the same results on the other side. When I was working at Serotta is was my job to verify all the tooling including the 2 alignment plates used in production. These plates were different brands but still needed to give the same results. It took me a long time to wrap my head around it and figure out how to get them to read the same as each other and the same on either side of the bike but it was time very well spent as you could go from bike to bike and plate to plate and rest assured it was what you thought it was.
    • Lastly – how much does all of the above matter? I would contend not that much. As was said above there are lots of bikes that are not .005” off but .120” off and they still ride fine and their owners are happy. One can even argue that bikes that are a little bit off and pull to one side are less prone to speed wobble (this is due to the fact that it will pull more or less to one side only and not set up an oscillation – if you have a bike that wobbles cock the rear wheel of to the side and the wobble in many cases will go away). So why bother with all the above? Well I’m anal beyond what is healthy and I enjoy it. I like knowing that I have done the best I can do and I’ve left nothing on the table (pun intended). It’s for my benefit only in most cases and I doubt the rider will notice a large difference but it makes me feel good and that is enough of a reason in my book. That and the fact that I’ve got the routine so down after establishing it so many years ago at Serotta and that I can do it in just minutes means it’s not a big time/money magnet so why not?

    This is just how I do it and I’m sure that are other ways that are just as good. I look forward to hearing how others handle this.

    dave
    D. Kirk
    Kirk Frameworks Co.
    www.kirkframeworks.com


  7. #7
    Join Date
    May 2008
    Location
    Better to be ruined than to be silent atmo.
    Posts
    22,142
    Post Thanks / Like
    Mentioned
    24 Post(s)
    Tagged
    0 Thread(s)

    Default Re: the tell all NO HOLDS BARRED alignment thread atmo -

    the thing i have always wondered about is head tube twist atmo. the ideal is none, and that the steering axis should be exactly in front of the bio-mechanical axis. if you look at the pictures above, i measure twist by reading a point on one end of an M+L rod and compare it with a point nearly a meter a way from it. the rod creates a virtual center-line, and i want the points exact, or up to a mm "off" (as long as no other measurable point elsewhere are also off). but some people measure the head tube at the head tube, and others measure the surface of it rather than the center-line that precision cones and rods will display. i have an intermediary cone/rod setup that i use when the frame is in the pinned and tacked stage that's half as long and lighter. it was made for me at Brown & Sharpe back when a pal of mine worked there 15-20 years ago. i think it's more precise than my marchetti tool. anyway, i am throwing this out there because - well, just because.

    when i first got my alignment table it was about 1982 and i felt i had finally added the last piece of the puzzle. there were at least 600 RS frames made before its arrival and all of them were checked the same way we did it all along at witcomb and witcomb usa. to a frame, any that was retrofitted onto my marchetti table for grins and giggles was not off by thousands - they were off by huge fractions of an inch, and in every conceivable direction. i have no recollection of alignment, bad or good, being attached to my reputation before 1982 so the question also begs what is served by improved tolerances. the best answer would include the concept of continued improvement to the brand. but if there was no known problem for the previous 7-8 years, how blissful is ignorance atmo?

    i think good alignment (oxymoron...) can help defend against early or improper wear of moving parts such as the ones that make up a drive train. to a smaller extent, it can also guard against creating orthopedic issues that can arise from pedaling an out of plane bicycle. the thing is, people are as asymmetric as things can be, so where is the line? hey - it's a rhetorical question, huh.

    i find that the more i know about what it takes to improve a procedure or hold a tighter tolerance, it all comes at the expense of production. i made far more frames per pound back when i had no fixture and never knew what an alignment table looked like unless i saw pictures of an italian shop than i ever have since. add to these the ever evolving twists and turns of better brazing technology, feeling more comfortable with the tactile side of handling different pipes, fittings, and assembly procedures, it won't be long before the best bicycles i can make take such an unreasonably long amount of time that 1) i can't find someone out there who can afford them, or, 2) can tell the difference. data point: the example is made as a point of reference for all of us, rather than to ridicule, especially me - i couldn't handle the scrutiny (sic).

    have a nice day.

  8. #8
    Join Date
    Jun 2008
    Location
    Sutton, MA USA
    Posts
    4,548
    Post Thanks / Like
    Mentioned
    1 Post(s)
    Tagged
    0 Thread(s)

    Default Re: the tell all NO HOLDS BARRED alignment thread atmo -

    Dazza, I'm curious what measurements in particular you think need to be within 0.1-0.2 mm (0.004-0.008"). Do they "need" to be there for the sake of the rider or for the sake of your piece of mind?

    I've always tried to adhere to Richard's rule of thumb that all error should sum up to less than 1 mm, and the reason is it was the only rule of thumb I could ever find or get anyone to admit to. There have been other statements in this thread that really echo my own thoughts. I think most builders chase alignment because we can and we think we should because its our name or company on the downtube. But Richard's post above about the economics of chasing perfect alignment really makes me think about the countless frames that have been made over decades by workers getting paid per piece and they were cranking them out and the vast majority rode just fine. I'm certainly not going to change my practices in the reverse direction of where I'm trying to go, but it's certainly great food for thought.
    Mike Zanconato
    Web
    | Instagram | Twitter | Facebook | Flickr | Tumblr

  9. #9
    Join Date
    Mar 2009
    Location
    Tulsa, Oklahoma, United States
    Posts
    2,983
    Post Thanks / Like
    Mentioned
    0 Post(s)
    Tagged
    0 Thread(s)

    Default Re: the tell all NO HOLDS BARRED alignment thread atmo -

    Ok, I'm going to put my "process" out for scrutiny. I think it's a good part of this discussion, because it'll help out people with no surface plate or alignment table.
    I use a 5 ft straight edge and a small metal ruler.
    I tack the front triangle and chainstays/dropouts and remove from the fixture.
    I use the straight edge on the bb shell and measure from the edge to the tube with the small ruler, which is graduated in 64ths. I measure at the bb end, and then right below the seat tube sleeve. Repeat on flip side to double check.
    I swing the straight edge around to the head tube, and measure from the edge to the top and bottom of the head tube. Flip, double check.
    All along the way I'm making sharpie marks to indicate where to braze first. I have been ending up with the same marks in the same place for a while, so I'm happy about that.
    Since my dt/ht joint is usually within a 64th, I place the straight edge against it, and then against the seat tube out to the rear dropout. I measure from the inside face of the dropout to the straight edge. Repeat for other side. They're usually about an 1/8" off to the non drive side. Part of me wants to fix my fixture, but since it's pretty much a known quantity I've left it alone. I just braze the outside drive and inside non drive of the chainstays first.

    I braze the frame with attention paid to my markings, and then repeat the process. I don't cold set anything except the chainstays, as I really don't have a solid enough base for tweaking main tubes. I put a wheel in the dropouts, and use the same method for checking at several places around the rim. Everything usually turns out within 1/32", and I pretty much am happy with that until I come up with a better way. I recheck after the bb shell is faced, but before all checks are done on both sides to account for any warpage of the shell. I heat the shell evenly during brazing, as Dave Kirk recommended and it's helped a ton. The faces stay a lot more parallel than when I didn't bring the bottom up to temp.

    I would appreciate input on this process, suggestions for improvement are very welcome.
    Last edited by edoz; 05-01-2011 at 01:10 PM. Reason: spelling
    Eric Doswell, aka Edoz
    Summoner of Crickets
    http://edozbicycles.wordpress.com/
    http://www.flickr.com/photos/edozbicycles/
    In Before the Lock

  10. #10
    Join Date
    Jun 2008
    Location
    Ballston Spa, N.Y. U.S.A.
    Posts
    168
    Post Thanks / Like
    Mentioned
    0 Post(s)
    Tagged
    0 Thread(s)

    Default Re: the tell all NO HOLDS BARRED alignment thread atmo -

    As far as alignment brazed frames go, I listened to advice from Richard back in about 2004, and my experience was improvement in my work from there on out. Since then, the carbon bikes I have large part in making have become, in part due to my efforts, so measurably straight that the people checking them have asked me on occasion if they could stop bothering to check them. Whether that can be felt or identified by the rider is an interesting question, but matters little to me as a fabricator, because one always wants to make every controllable aspect of what they're building the best that it can be. While I don't doubt what others measure regarding some carbon products, the experience doesn't resonate with me, maybe since I don't measure the same products. I think that if they're bad, it's the system that produced them to fault, not the inevitable result of the material or manufactured quantity size.

    The problem with discussing this stuff on the internet is that what everyone measures, and the way they measure it, is driven by individual presumptions and feasibilities, and certainly not by a market need. Those issues arising from such things aren't duplicable and as such impossible to corroborate. Mike, I'm sure you have the wherewithal and resources to continually advance in regard to alignment if that is your need. Let me know if I can help, too.

  11. #11
    Join Date
    Jun 2008
    Location
    Philadelphia,PA
    Posts
    1,505
    Post Thanks / Like
    Mentioned
    1 Post(s)
    Tagged
    0 Thread(s)

    Default Re: the tell all NO HOLDS BARRED alignment thread atmo -

    I kind of figured this thread would be avoided like the plague. In respect to what Dave said I guess I should state that I extremely shortened my process into a single paragraph. In my smoked out I spoke about my process which can be read here.

    I did not mention the marking of butting and checking run-out to mark miter direction. Again I use a back plunger dial indicator for run-out inspection. Some of the heat treated tubes can be upwards of .030" out of straight so it really matters where you orient the tube for mitering.

    I have dedicated a huge amount of time to this part of framebuilding and have always been willing to talk about it. I think it is a topic that so many avoid so this is a good start.

    This is where I feel it is so important to understand your fixtures and how they were made or how to make them. The more you understand about tooling/fixtures the more you understand why something might not work or actually does work.

    Eric- If your rear end is out 1/8" each time my question is this. Are you fitting the chainstays with no gap using this error? If so the chainstays are being cut to two different lengths and you are fighting a downhill battle once you pull it out. This is why it is so important to have a good fixture. Do you have an accurate way to check chainstay length? Are you leaving one stay un-attached at some point to align before final tacking or brazing? Fix the fixture is my advice.

    Cheers,
    Drew
    Drew Guldalian
    Engin Cycles
    www.engincycles.com

  12. #12
    Join Date
    Jun 2008
    Location
    Sutton, MA USA
    Posts
    4,548
    Post Thanks / Like
    Mentioned
    1 Post(s)
    Tagged
    0 Thread(s)

    Default Re: the tell all NO HOLDS BARRED alignment thread atmo -

    Yeah, I agree. It's tough to distill a whole process into a single summary post. I'm certain that we are all doing things at every point in the process to control alignment. I find in my own process that the more attention I pay to making sure my miters are as parallel or perpendicular as possible (depending on the tube/tube interaction of course), the better it looks on the plate after tacking and the less it moves during brazing.

    One thing that has always baked my noodle is the 0.002-0.005" clearances in a socket that are suggested for brazing. Let's say you have 0.003" clearance in a BB socket for the down tube and you tack the tube on the side of the socket rather than in plane with the center of the frame. Say the tack cools and the tube pivots to closes the gap to 0.001. The deflection you would measure at the other end of the tube is 0.048". To most of us, that's a mile. It puts into perspective the tolerances we are really working with at the actual joint.
    Mike Zanconato
    Web
    | Instagram | Twitter | Facebook | Flickr | Tumblr

  13. #13
    Join Date
    Dec 2009
    Location
    Tennessee
    Posts
    132
    Post Thanks / Like
    Mentioned
    0 Post(s)
    Tagged
    0 Thread(s)

    Default Re: the tell all NO HOLDS BARRED alignment thread atmo -

    As a new builder of two years, I was fairly consumed about how straight is straight. I felt two ways on this subject as I feel on the whole 'frame stiffness': 1- Yes, straighter is better 2- How much does it really matter because the rider just by throwing a leg over a bike will alter the dimensions (with apologies....a frame is a frame). When I put a surface plate in my shop, I pulled my hair out for months chasing numbers. The one thing this did was make me realize my entire process (jigs/fixtures included) needed scrutiny and improvement. What I've learned has made my frames much better in terms of this topic, given me a better understanding of building resulting in everything being in concert, and certainly given me a obsession to make each frame straighter. Though I cannot tell differences between my frames before or after plate, my plate can. Which brings me to the question, is claiming your frames straight simply a marketing ploy.
    I do shoot for under .039 in any long dimension and/or all short dimensions totaled. Anything less and I start chasing as I weld out of a jig and basically can look at the frame....it moves.

    Hey, thanks for the topic to feed my neurosis!

  14. #14
    Join Date
    Jun 2008
    Location
    Sutton, MA USA
    Posts
    4,548
    Post Thanks / Like
    Mentioned
    1 Post(s)
    Tagged
    0 Thread(s)

    Default Re: the tell all NO HOLDS BARRED alignment thread atmo -

    the plate isn't riding the bike.

    hey, that was a joke.
    Mike Zanconato
    Web
    | Instagram | Twitter | Facebook | Flickr | Tumblr

  15. #15
    Join Date
    May 2008
    Location
    Better to be ruined than to be silent atmo.
    Posts
    22,142
    Post Thanks / Like
    Mentioned
    24 Post(s)
    Tagged
    0 Thread(s)

    Default Re: the tell all NO HOLDS BARRED alignment thread atmo -

    Quote Originally Posted by 3wfab View Post
    Which brings me to the question, is claiming your frames straight simply a marketing ploy.
    yes - but that shouldn't matter atmo.

  16. #16
    Join Date
    Jun 2008
    Location
    Bozeman MT
    Posts
    1,773
    Post Thanks / Like
    Mentioned
    0 Post(s)
    Tagged
    0 Thread(s)

    Default Re: the tell all NO HOLDS BARRED alignment thread atmo -

    I think the tough thing with alignment is deciding how far to take it - in other words when to say enough it enough. It's certainly true that getting the bike very close to 'perfect' alignment will take a given amount of time and making it 10% better will take twice that time. Is it worth it? I don't know and I think it will depend on how long this takes.

    If the frame is brought to +- 1mm and that takes 20 minutes in total and getting it down to 1/2 mm adds an hour I doubt that it time well spent. I had the luxury at one time to not worry about time and just figure out how to get things done. It was done on someone else's dime and done with their approval and was as much academic as anything else and I learned a lot. I could spend all day to get the bike to a point where practically speaking you couldn't make it better. Did that bike ride better than a bike that went through an abbreviated procedure and had a looser tolerance? No I doubt it did. But it did teach me what could be done in a reasonable amount of time.

    I'd say my entire procedure takes about 20-25 minutes in total. This considers the time inspecting the tubes before they go into the frame and the time spent after the BB is faced and the bike goes onto the plate. I'm comfortable with this amount of time even while knowing that if I spent twice the time I could make it better/closer/straighter by a very small amount.

    I think perfect alignment is a good goal and something to work toward while recognizing that it can't really happen. I also think the mental puzzle and curiosity is a good thing and will teach the builder more about what matters and what doesn't.

    Interesting stuff.


    Dave
    Last edited by Dave Kirk; 05-02-2011 at 12:02 PM.
    D. Kirk
    Kirk Frameworks Co.
    www.kirkframeworks.com


  17. #17
    Join Date
    May 2008
    Location
    Better to be ruined than to be silent atmo.
    Posts
    22,142
    Post Thanks / Like
    Mentioned
    24 Post(s)
    Tagged
    0 Thread(s)

    Default Re: the tell all NO HOLDS BARRED alignment thread atmo -

    Quote Originally Posted by Dave Kirk View Post
    <snip>...This considers the time inspecting the tubes before they go into the frame and the time spent after the BB is faced and the bike goes onto the plate.
    i face the shell once before a frame is made and the part never sees a cutting tool again. my experience is that every (re)face doesn't simply remove a equal layer; it actually creates a completely different (new) reading when a frame is reinstalled on an alignment table. after years of that ordeal, i decided to go one-shot on the bracket and live with the consequences. on the team frames, i don't even use a facing tool; the specs that the shell is delivered to me from the foundry is good enough.
    Quote Originally Posted by Dave Kirk View Post
    I think perfect alignment is a good goal and something to work toward while recognizing that it can't really happen. I also think the mental puzzle and curiosity is a good thing and will teach the builder more about that matters and what doesn't.
    i assume you meant "about what matters and what doesn't" and i would fully agree atmo.

  18. #18
    Join Date
    Feb 2009
    Location
    Scotland
    Posts
    425
    Post Thanks / Like
    Mentioned
    1 Post(s)
    Tagged
    0 Thread(s)

    Default Re: the tell all NO HOLDS BARRED alignment thread atmo -

    Hi,

    I'm interested in what folks have to say about aligning based on bb shell face compared with other methods or data points.

    I'm a completely self taught builder and when I first started, I knew I had to make sure my frames were straight. To begin with I had no idea how to do that. The interweb didn't exist and I had never set foot in another workshop to see how it was done elsewhere. I bought a huge big (certified) granite table because I knew I had to have something that I knew was flat.

    I then thought about what needed to be straight. It never occurred to me that the BB shell would be the one place that now seems to be the most used reference point. I still think it's weird! My first thought was that the wheels obviously needed to be in the same plane and following on from that, the seat tube needed to be on the centerline of the frame and on the same plane as the wheels.

    Because I didn't know how other folks were doing this, I looked around at what I could use to help me with all this and settled on a set of bench centers:


    I machined up some inserts to fit into my headtubes and with these fitted in the frame I now had a headtube sitting parallel to the table. I also had a known centerline for the frame. Next up was to machine a block to support the (faced) bb shell. I made a couple to handle different shell widths. I knew what height these blocks needed to be because I knew the frame centerline (or height from the table).

    With the frame now resting on the block by the bb shell, this setup allows me to check along the length of the seatube to make sure it's parallel to the headtube and the same height off the table.

    I also made a little tapered doohicky to slide inside the seattube, this was useful to check the seattube was at the correct height from the table but I don't use that too much anymore. I work mostly on the outside of the tubes.

    As an aside, with my flat bb support block, it's easy to tell if there is twist at the shell just by looking to see if the shell is sitting on the block flat. I have a small lamp on my table positioned behind my view of the shell so I can spot light leaking through. I can also check it's perpendicular to the centre line by using a square. Note here that this only tells me the outside of the shell is square.

    Initially I used a height gauge for checking tubes but now I have a purpose built gauge that's fixed at the known centre height. Checking the rear triangle is pretty much the same exercise and I use one of those neat gauges that have steps for different dropout spacing. I think I got mine form Joel? at Clockwork but I might have misremembered that.

    One major benefit I think this system has is that I can swing the frame over (pivoted by the headtube) and make sure the dropouts are the same height off the table on each side.

    Obviously the alignment by bb shell works for the majority of builders but I'm interested to know the reason for choosing the shell for the data point. Is it to be sure the crank is always in the same plane as the frame centerline?

    A final point is that I often hear people talking about chasing alignment around the table and never having repeatable setups, different readings everytime the frame is brought back to the table. How do you manage this? If you need to tweak some alignment away from the table, how can you put it back on the table and be confident you've done what needs to be done?

    Greta thread btw.

    Steven
    Steven Shand
    www.willowbike.com
    Handbuilt Bicycles - Scotland, UK

  19. #19
    Join Date
    Jun 2008
    Location
    Bozeman MT
    Posts
    1,773
    Post Thanks / Like
    Mentioned
    0 Post(s)
    Tagged
    0 Thread(s)

    Default Re: the tell all NO HOLDS BARRED alignment thread atmo -

    Quote Originally Posted by e-RICHIE View Post
    i face the shell once before a frame is made and the part never sees a cutting tool again. my experience is that every (re)face doesn't simply remove a equal layer; it actually creates a completely different (new) reading when a frame is reinstalled on an alignment table. after years of that ordeal, i decided to go one-shot on the bracket and live with the consequences. on the team frames, i don't even use a facing tool; the specs that the shell is delivered to me from the foundry is good enough.

    i assume you meant "about what matters and what doesn't" and i would fully agree atmo.
    Cool.

    My experience with shells is that they are faced very well from the casting house and are fine without facing to start but it's after they have been heated asymmetrically (all the tubes being on one side) that the top side shrinks and the faces go wonky.

    Have you measured the width/parallelness of the shell after brazing? I would expect that you would find that the top side (where most of the heat is) would get narrow. I usually see the top being about .005" narrower that the bottom and when projecting this angle over the length of the seat tube you end up with the top of the seat tube being low which would result in the top of the seat tube being about 2 mm low on the plate. This is one reason I face post brazing. The other is that I want the faces that the BB bearings snug up to to be parallel so that the bearings will have the easiest life possible.

    And yes - I need you as my early morning pre-coffee editor. I did mean 'what' and will go back and tweak that. Thanks for catching it.

    dave
    D. Kirk
    Kirk Frameworks Co.
    www.kirkframeworks.com


  20. #20
    Join Date
    Jun 2008
    Posts
    1,636
    Post Thanks / Like
    Mentioned
    0 Post(s)
    Tagged
    0 Thread(s)

    Default Re: the tell all NO HOLDS BARRED alignment thread atmo -

    Frame alignment in a sentence: The bottom bracket shell and axle centerlines are in plane and parallel to each other with the seat tube centerline perpendicular to the BB centerline and the head tube centerline in plane and parallel to the seat tube.

    IMHO, that is the alignment that ~really~ matters. The rest is checking craftsmanship or geometry which in my mind is more important, and if done correctly, makes "alignment" a non-issue. Tube runout, straightness, etc., are craftsmanship issues and have no effect on alignment if the critical elements listed above are true.

    Seat tube centerline to BB centerline perpendicularity is the most important biomechanical interface a rider has with his bike (geometry is a variable, perpendicularity is not). Having that as close to perfect as possible should be every builders goal and is the one problem I have with aligning to the head tube. If you align to the head tube you may not be maintaining or even checking that critical relationship between BB centerline and seat tube centerline. This is also a problem with checking to a BB face that is not blueprinted.

    These are just my opinions. I have others.
    "It's better to not know so much than to know so many things that ain't so." -- Josh Billings, 1885

    A man with any character at all must have enemies and places he is not welcome—in the end we are not only defined by our friends, but also those aligned against us.


Page 1 of 4 1234 LastLast

Bookmarks

Bookmarks

Posting Permissions

  • You may not post new threads
  • You may not post replies
  • You may not post attachments
  • You may not edit your posts
  •