
Hey Tony,
James did find you,checkout cyclingnews NAHBS version 7 i think.
Bill

 Likes: 0
 Slide to the back


Hey Tony,
James did find you,checkout cyclingnews NAHBS version 7 i think.
Bill
OTF
Tyler - thanks for the comments. Like my guitar teacher says, "there's more than one way to skin a cat."Originally Posted by Tyler Evans

As for using external locations we have done a bit of that and I definitely want to do more. The hanger location used in the recent Hampsten photos is really amazing.
I think adding a sense of place is important for the overall impression and experience.
Garrett riding #1
Using an old Railroad bridge near a local park.
Conor
Newb
For those of you who weren't at NAHBS, here's the setup the photographer (Mark Dawson) who did the studio shots used. One strobe in the overhead softbox (with a flag behind it to keep the background dark), reflectors on each side, and a full-length reflector up front and down low. Not a lot of equipment, but good results. The background could have been better (more absorbent), but it worked pretty well considering it was what was available!
And Conor - nice work!
Andrew

Last edited by Andrew Drummond; 03-11-2011 at 03:26 AM. Reason: spaced out
Steher 10000
Tony, I'm in the same boat. I found this website to be pretty useful. now I just need to find the time to do it.
MY PHOTO SETUP
Edit: Oops, Mr. Vogel beat me to it.
Last edited by zank; 03-11-2011 at 08:02 AM.
BSA Spokesperson
Yes he did! I wasn't there when he came by (note the lack of photo captions), but it looked like he was able to get a fair bit of information for the front page description from my informational displays.
Steher 10000
I found some commentary on Strobist about the link I posted above. Skip the fluff in the first paragraph.
Ghetto Studio: Compact Garage Background Support
http://strobist.blogspot.com/2008/09...ackground.html
Posted: 15 Sep 2008 12:50 PM CDT
MY PHOTO SETUP
I love it when a great idea just drops in out of the blue. This one is from Ray Dobbins, a bicycle collector who likes to take photos of his prized objects in his garage. He is totally frugal on the light, using a pair of cheapo worklights as main sources. Brownie points for that, obviously. But it's the two small metal brackets he made that will certainly find their way to my garage. When I get a garage, that is. Ray is wonderfully low-end on his whole setup, having just upgraded to a 4MP Kodak EasyShare camera. He is bouncing the two worklights off of the ceiling, and putting the bikes on seamless white, including a sweep to fill on the bottom. Further he fills with white flats on the sides to smooth out the light even more. The genius in his setup is this small bracket, which he uses to attach white seamless paper to his garage shelving. What a great idea. Since he is shooting bikes, he does not even need to run the shelving up to the ceiling to get full height --which is exactly what I would do. He holds the paper roll in with to (retractable) bolts. What could be simpler? I am almost certainly gonna have a neater garage (one day) because of this idea. Ray, my wife thanks you.
And since one good turn deserves another, let's take a few minutes to help Ray pimp out his lighting and image management -- while staying on his super-tight budget. (Not that Ray is a tightwad, either. He just likes to spend money on bikes, rather than lights...)
First, you are really going in the right direction with the white flats. Big, creamy highlights on the sides and floor make your bike's form come to life. Let's continue down that path a little more.
I would suggest using small pieces of black cardboard between the worklights and the bike in your current setup. This will kill any hard, direct light. So all of your light will be creamy bounce light. The net affect will be to kill small, hot-spot reflections in the tubing. As a bonus, it'll also kill hard shadows behind the bike.
Second, I see that at least one of your lights is a double worklight. Sweet. You can do all of your ceiling bounce with just one double light. Place it in the center of the garage and aim the two lights toward the respective sides of the ceiling. You just scrounged yourself a second light source to use for free.
This next idea is gonna sound a little fancy-pants, but it'll make those bike tubes come to life in a killer way: Get an old sheet. Queen sized would be ideal. Stretch it on a cord, so it hangs, clothesline style, across the garage just behind your tripod/camera position. Stick your second work light a ways back, behind the sheet and aiming at it. You just made yourself a huge, on-axis ring light / soft box. Combined with the bounce light on the ceiling and flats, this light will sculpt your bike's form very nicely, with no glaring hot spots, either. Make sure to fill the sheet with light -- back the light up. This will make your white background much easier to tame and keep smooth, too.
And, assuming you'd rather spend $600 on some obscure Campy seat post than a new copy of Photoshop, you can now do pretty decent image post processing online for free with Photoshop Express https://www.photoshop.com/express/landing.html and/or Picasa http://picasa.google.com/ .
Thanks for the background bracket idea, Ray!
Last edited by zank; 03-28-2011 at 07:32 AM.
Paceline
I have a canon 20d and a 50mm F1.8 lens I bought for 300 bucks on ebay.
It seems to get the job done. If you just spend a little time with the right setup natural light can be your best friend. It really helps to have a big (read smaller number like f1.4 or f1.8) aperture lens to pickup more light.
On a side note, my friend John seemed to get some good photos at nahbs he runs prollyisnotprobably.com and is one man as well, with a simular setup to mine I might add!
In the drops
As a customer and former photojournalist I often find myself looking at builder's websites and asking “is that what they really want to say about their bicycles?” I stress the photojournalist portion because unlike studio work (which strives to capture perfection) photo-j strives to tell a story and convey emotion. Many of the builders have very nice, technically correct (good depth of field, exposure, flash metering, color balance, etc, etc, etc) and professionally taken pictures of their work, and yet some of it fails to capture my interest as a consumer. Sure, I can appreciate the technical beauty of the work, both in terms of the product (the bicycle or frame) and the image, but they come across as sterile and fail to connect with me on an emotional level. Sure, I know that “emotional level” may sound like BS, but many builders build amazing bikes, and yet for some reason there are ones that spark the “Damn, if I had that my life would be much happier,” type feeling. Laugh all you want, but to discount the “emotional” desires of the customer is to sell yourself and your work short.
For your consideration I might suggest the following:
(1) Too many technically correct, studio perfect, photoshop polished to perfection photographs leaves many customers without a "feel" for your work's intended purpose.
(2) Consider using the studio for mainly shooting the detail work. Shorelines, stems, lugs, etc are best captured under controlled environments where the beauty of your craft can be put on full display.
(3) Images of the full bike might be best displayed a more natural environment with soft natural lighting to give a better feel for the intended use.
(4) Don't forget to provide potential customers with images of your work at use in its natural state of being (ie, being ridden.) These images more than anything can aid in establishing the emotional connection between customer and your work.
Think of a car commercial, the beginning of the commercial almost always shows some of the details of the car. Then the car is shown in dynamic motion. Finally the car is shown in profile.
Last edited by dcpdpayne; 04-05-2011 at 12:20 PM. Reason: 32 hours awake is no time to answer a question.....sleep be damned
"I think I know what military fame is; to be killed on the field of battle and have your name misspelled in the newspapers."
VelocipedeSalon.1

Tony, I'd like to move this terrific thread to the framebuilders WIKI so it remains ontop and avail. for future use. Cool?
Josh Simonds
www.nixfrixshun.com
www.facebook.com/NFSspeedshop
www.bicycle-coach.com
Vsalon Fromage De Tête
BSA Spokesperson
One of a kind Vsalonista
something that i have been looking at a bit. we have a lot of bikes here which.. well.. maybe one day they'll get photographed.
I am working with another guy on this who has done the bulk of the rig building and setup. It's taken some time as it has to be fitted in around making a living. The job is a bit more complicated than it may immediately appear to be, and is part of an overall wider project to document some of the history we have here.
we have been working through a setup that doesn't take up too much space, brings out character in the bikes and gives a professional enough finish to publish.
There are really many ways to photograph bicycles. we did quite a lot of research on what results there are out there, and kept coming back to the images in "The American Bicycle". They pop.
They were shot in a studio by Dennis Biela, who can be found here these days: LightSpeed Media
So thats what we went for as a starting point. recreate them. with a small budget.
We didn't want to bother him, but couldn't find any shots of the setup he used, so we looked at the pictures closely and made a rig we thought would give similar results.
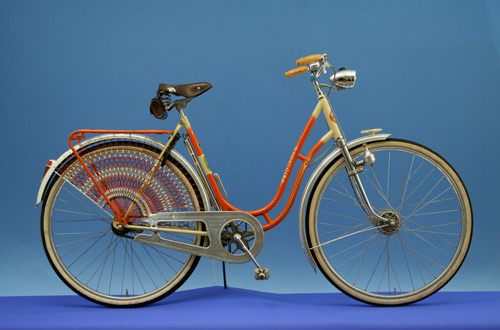
Here is the result straight off the camera.
Ill post up some shots of the rig later. basically a 2.7m wide platform, 2 shades of blue paper, a beam with a load of lights screwed onto it which fits in the gap between the platform and the backdrop and a couple of halogens like dobbins uses. a white ceiling was also used. I expect we will settle on polystyrene and play around with the height. white roller blinds to be used on each side.
I really like the result. the light gap / 2 tone effect works well.
attached is the equipment currently awaiting some space for permanent setup which should hopefully occur within the next few weeks. then i will give a more detailed description of the dimensions and materials used. we are currently finalizing the logistics of the task at hand.
Slide to the back
I think you're doing well. I'd like to hear more about your setup. Do you have any software, ie photoshop? Having the split background does not bother me at all. In fact, I like a little reality in the frame. The seamless backdrop etc. is all nice, but it's a bit like technology for the sake of technology. Keep us informed.
Craig
Double Butted
I was just looking at that book yesterday and thinking about this thread. I did not get the lights behind thing at all, but I like how it is two shades. I messed around with my own setup and am happy with the results so far.
Motordoper
Those looking for cheap lighting, go to your flee market. I scored 2 professional 1000W lamps for € 13.- ($15.-) together. Tripods to hold them were € 5.- each.
One of a kind Vsalonista
thanks. i added a little more to the post.
the goal for us is to get the best raw image we can with what we have, which is very basic equipment. test shots will be taken and sent over to someone who knows about whether the raw is of any use and advise. when an A-OK comes in return, we are set to go.
Post we will worry about when we come to it. maybe someone else will be dealing with this.
we will be focusing on getting the original images as useful as possible.
will do. once the thing is set up again, ill take some more pics and measurements.
Posting Permissions

 Reply With Quote


Bookmarks